Kilimanjaro Navigation: Trails, Pacing & Summit Night
How to navigate Kilimanjaro — well-trodden Machame trail, guide-led pacing, pole pole acclimatisation and summit-night switchbacks.
Hiked by Lee
Guided
Last verified
Kilimanjaro is guide-led — you won't navigate independently. The Machame trail is well trodden in season, but pacing and acclimatisation routing are where guides earn their fee.
Also read: Complete Guide · Itinerary · Trek overview


Waymarking
| Reality | Detail |
|---|---|
| Trail markers | Main routes are obvious in peak season |
| Traffic | Hundreds of hikers = clear path |
| Guide required | Park rules + safety — don't self-guide |
| Off-trail | Not permitted — stay on route |
Unlike Skye or Hornstrandir, navigation is rarely the challenge — altitude pacing is.
Your guides are the navigation system
| Role | What they do |
|---|---|
| Lead guide | Sets pace, monitors AMS symptoms |
| Assistant guide | Sweeps group, helps slower climbers |
| Porters | Know every camp, shortcut and water point |
Listen to pole pole — Swahili for "slowly, slowly." Fastest-looking hikers often fail at altitude.
Navigation tools (personal backup)
- Track daily elevation gain
- Monitor rest breaks and pace
- Summit night timing reference
Not essential — guides lead — but useful for personal data.
Balance on Barranco Wall scramble and long descent from Uhuru.
Acclimatisation navigation — climb high, sleep low
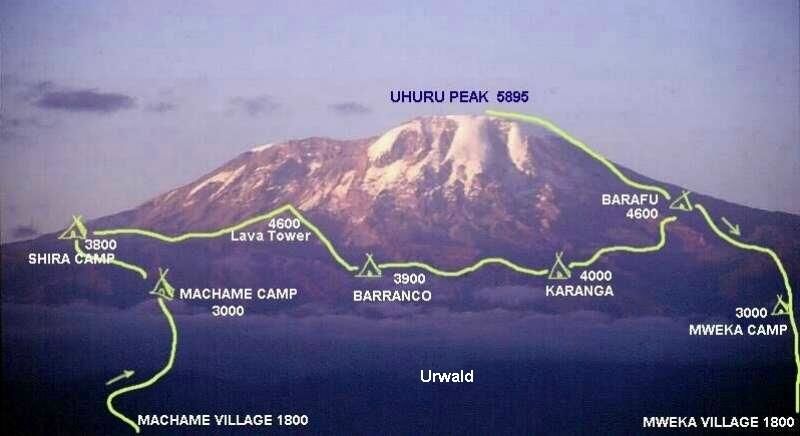
Day 3 is the key navigation decision on Machame:
| Leg | Elevation | Purpose |
|---|---|---|
| Shira → Lava Tower | Climb to ~4,600 m | Expose body to altitude |
| Lava Tower → Barranco | Descend to ~3,960 m | Sleep lower for recovery |
This detour up then down is deliberate — skipping it increases AMS risk.
Summit night route
| Segment | Navigation |
|---|---|
| Barafu → Stella Point | Switchbacks in darkness — follow guide's headlamp line |
| Stella Point → Uhuru Peak | Flat rim walk — ~45 min |
| Descent | Same path down — faster but knee-heavy |
| Tip | Why |
|---|---|
| Headlamp fully charged | Spare batteries in warm pocket |
| Stay close to guide | Easy to lose path in dark |
| Don't rush | Turnaround time set by guide |
Lee reached Stella Point early and paced back and forth waiting for sunrise — stay warm.
Key trail sections
| Section | Nav note |
|---|---|
| Rainforest (Day 1) | Muddy, rooty — poles help |
| Barranco Wall | Scramble — hands on rock, don't look down |
| Alpine desert | Cairns and worn path |
| Summit scree | Switchback grind — one step at a time |
Emergency / bail-out
| Situation | Response |
|---|---|
| AMS symptoms | Guide decides descent — listen immediately |
| Injury | Porter-assisted descent or helicopter (insurance) |
| Summit turn-back | No shame — safety over summit |
| Weather | Rare closure; guides monitor conditions |
Helicopter evacuation requires insurance — no roads on the mountain.
Pre-trek checklist
- Reputable guide company booked
- Headlamp tested with spare batteries
- Trekking poles adjusted for height
- Understand pole pole pacing commitment
- Travel insurance with evacuation cover
Related planning
- Difficulty — altitude is the real challenge
- Itinerary — Lava Tower acclimatisation leg
- Packing list — headlamp and poles
- Getting there — Machame Gate start