The Skye Trail Scotland | Self-Guided Complete Guide
Exploring Scotland’s rugged beauty calls out to adventurers, and few routes are as breathtaking as the Skye Trail. From dramatic coastal cliffs to peaceful glens, this trail offers an unforgettable journey through the Isle of Skye’s stunning landscapes. The Skye Trail passes by historical landmarks, including abandoned villages like Boreraig, which remind hikers of the area’s tumultuous past and its impact on the local population. But planning a self-guided adventure on the Skye Trail can feel overwhelming. What are the must-see highlights? How do you navigate the path without a guide?
My complete guide is here to simplify your trek, with essential tips, route insights, and practical advice for a seamless experience on the Skye Trail Scotland. You will learn from my experience – both the good and the bad. Ready to explore? Let’s dive in!
What is the Skye Trail Scotland?
The Skye Trail is a renowned long-distance walking route on the Isle of Skye in Scotland, known for its wild landscapes, challenging paths, and scenic beauty. Unlike other established trails, the Skye Trail is an unmarked route, making it a true adventure for experienced walkers. Spanning approximately 128 kilometers (79 miles), it takes hikers across diverse terrains—from rugged coastlines and ancient moorlands to steep mountain ridges, steep trails, and hidden glens.
This trail is perfect for those looking for a raw, self-guided hiking experience. With sections passing through iconic Skye landmarks like the Quiraing and the Trotternish Ridge, the Skye Trail is as much about connecting with nature as it is about testing one’s endurance and navigation skills. Be prepared for everything from steep ascents to tranquil lochside walks, with views that showcase some of the best that Scotland’s wilderness has to offer.
While this path is not for beginners, those with good hiking experience will find the Skye Trail a challenging yet immensely rewarding journey into the heart of Scotland’s wildest landscapes.
Also Read: Landmannalaugar Hiking Guide
Customizing the Skye Trail
The beauty of the Skye Trail lies in its flexibility—whether you’re after steep ridges or scenic coastlines, you can tailor your journey. Many walkers choose to break the route into seven-day segments, but with its diverse variations, it’s also possible to make the hike shorter or longer based on time and endurance. Each variation on the trail offers its own perspective on the Isle of Skye’s breathtaking natural beauty, ensuring there’s something for every adventurous spirit. Among the unique landmarks, hikers can explore deserted villages, which add historical depth and a sense of melancholic beauty to the experience.
All Trails Interactive Map can be found here.
The Skye Trail: My 6 Day Itinerary
Getting to Rubha Hunish: Starting Point of the Skye Trail
Rubha Hunish, the northernmost tip of the Isle of Skye, marks the starting point of the Skye Trail and offers stunning coastal views to kick off the journey. It is also a great spot to observe sea eagles in their natural habitat. However, reaching this remote spot requires a bit of planning, as it’s not directly accessible by public transport. Here are some options to consider:
Also Read: Full Guide to Laugavegur Trail

1. By Car
- Best Option for Flexibility: Renting a car is the most convenient way to reach Rubha Hunish, especially if you’re bringing hiking gear or planning a custom schedule.
- Driving Route: From the Skye Bridge or the ferry terminal in Armadale, drive north through Portree and Uig. Continue towards Duntulm on the A855, then follow signs to the parking area near Kilmaluag. Rubha Hunish is a short walk from the car park, making this the quickest way to reach the trail’s starting point.
- Tip: Plan for a round trip if you’re not finishing at Rubha Hunish, as parking can be limited.
2. By Bus or Public Transport
- Option for Public Transport Travelers: Buses on the Isle of Skye offer some access to Rubha Hunish, though schedules can be limited and may require some walking.
- Route: Take a bus from Portree to the town of Uig. From Uig, there are seasonal bus services to Kilmaluag, which is within a 2-3 mile walk of Rubha Hunish.
- Important Note: Public transport can be limited in remote areas of Skye, so check schedules in advance and consider staying nearby the night before starting the trail.
3. By Taxi or Private Transfer
- Ideal for Groups or Solo Hikers Without a Car: Hiring a taxi from Portree or Uig is a convenient way to reach Rubha Hunish if you don’t have your own transport.
- Booking Options: Taxis on Skye can be pre-booked for early or late arrivals, and some companies offer set rates for hiking transfers.
- Tip: This can be a cost-effective option for groups, as the cost can be split among travelers.
4. By Organized Shuttle (Seasonal)
- Option for a Hassle-Free Start: Some local tour companies offer shuttle services to trailheads, including Rubha Hunish, especially during peak hiking season.
- Booking Ahead: Check with Skye-based travel companies in advance, as availability and service areas vary. Many of these shuttles can also carry gear, which can be a helpful bonus.
Planning Your Route Back: Since the Skye Trail does not loop, it’s helpful to plan a transport option for your return from Broadford or arrange a pick-up.
Day 0: Arriving in Inverness
After a full workday in Amsterdam, I hopped on a direct flight to Inverness, arriving late in the evening. Tired but excited, I grabbed an Uber straight to my hostel, where I’d smartly booked a private room. Arriving late, I knew I’d need some time to settle in, so after a quick shower, I spread out my gear to unpack and repack for the next day’s hike.
But then, a quick check of the weather forecast changed everything. My original plan had been to head to Portree, unwind for a day, and start the trail fresh. However, the weather had other ideas. It looked like the next two days were going to be my best shot at clear skies before the rain rolled in. So, with that in mind, I pivoted my plan: I’d start the Skye Trail tomorrow, making the most of those first days of “good(ish)” weather. The adventure was about to begin a day earlier than expected!
Day 1: Portree to Rubha Hunish to Flodigarry
I started the morning with a quick breakfast at the hostel, then set off toward the bus station in Inverness. The bus ride to Portree on the Isle of Skye, about 3.5 hours, flew by as I soaked up some truly breathtaking landscapes. Rolling past ancient lochs and castles, I was already captivated by Scotland’s wild beauty—even with the chilly, misty rain tapping at the windows.
Also Read: Fimmvörðuháls Trail Guide

Arriving in Portree felt like stepping into a postcard. This charming little town welcomed me, and I couldn’t resist grabbing a classic fish and chips for lunch before making my way to the school bus station, where another bus would take me to the start of the Skye Trail.

Another scenic hour later, the bus finally dropped me off at the trailhead, marked by none other than a red telephone booth—an iconic and rather quirky starting point. By then, the sky had cleared, promising me a beautiful day ahead.

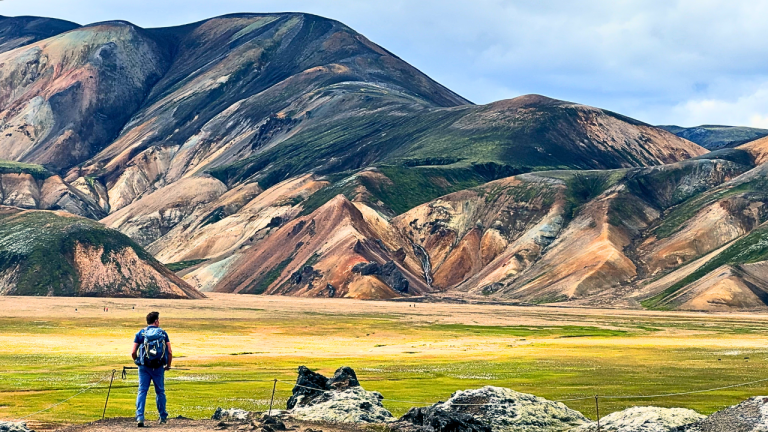
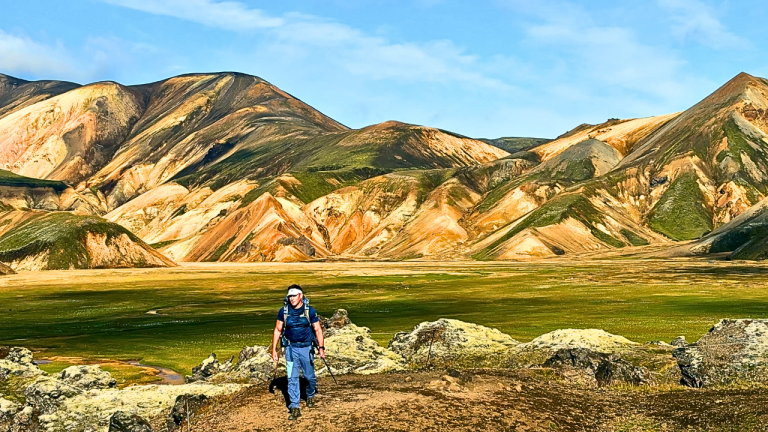
The hike itself was pure magic. Most of the day, I felt like I was walking along the edge of the world, with jagged cliffs plunging dramatically into the ocean below. Although the day was clear, the ground was boggy, so my boots were soon thick with mud—a small price for those epic views. The trail was unmarked, which added a thrilling sense of adventure. I had to rely on my own navigation, and the freedom of being out there, fully self-reliant, was energizing. Along the coastal sections of the trail, whale watching is a popular activity, especially during the summer months when Minke whales can often be seen.

Thanks to long summer daylight, I finished around 7 p.m., just in time to reward myself at the local hotel with a cold beer and my first taste of Scotch whisky—a fitting end to my first day on the trail. Camping wasn’t an option yet (closed for the season), so I bunked in a dorm at a nearby hostel. In hindsight, it was a bit of a blessing, as the midges were out in full force!

Distance: 13km, 345m elevation gain (around 5 hours). Accommodation: Hostel
Day 2: Flodigarry to The Storr via Trotternish Ridge
This was the day I’d both dreaded and looked forward to—the famed Trotternish Ridge lay ahead, a stunning but exposed stretch that I knew needed clear skies and steady weather. That’s why I’d pushed to start a day early. After a quick breakfast, I packed up and hit the trail by 7 a.m., ready for a challenge.

The morning was pure magic. The cool air, the occasional bleat of a lone sheep, and the mirror-like lochs reflecting the sky all felt surreal. I wound my way toward the ridge, soaking up the views with every step. It was one of those moments where everything—right down to the crisp smell of the air—felt perfect.

Then came the ridge. This was a scene out of a dream: no other hikers, just me, the open sky, and views stretching endlessly toward the horizon. The solitude and sheer beauty were overwhelming. I spent ages with my drone, capturing shots and simply being in the moment. The Trotternish Ridge is also a prime spot to observe golden eagles, adding to the magic of the hike. After a solid 8 kilometers, I approached a public parking area and, for the first time, crossed paths with day hikers. The contrast felt strange—I’d just come from complete wilderness into the buzzing energy of weekend explorers.
Also Read: Best Hiking Drones

Quickly moving on, I ventured into the second half of the trail. Here, things got intense. This section was rough, remote, and demanded solid navigation. The heat was relentless, and water sources were nonexistent. My water supply started dwindling, and every hill seemed tougher than the last with my heavy pack digging in. To top it off, my knee—already sensitive from an injury two weeks ago—started giving sharp, hot jolts of pain, making each step feel like a battle. But I dug in and kept moving forward, one determined (and slow) step at a time.

As the sun dipped lower, I finally reached the last stretch of the ridge before the Storr. Exhausted and hurting, I knew I couldn’t make it all the way. The wind had picked up, and I was too exposed to risk pushing on. Spotting a sheltered nook behind a rock formation, I set up camp right there on the ridge, hoping it would hold against the gusts that were rolling in.

That night, I huddled up with a quick bite and a hot drink, bracing myself for the wind. It was my tent’s first real test, and I crossed my fingers it would stand up to the weather. Sleep came in fits, with the tent swaying around me, but somehow, in that wild, stormy night, I felt strangely at peace.

Distance: 27.5km, 1630m elevation gain (around 12 hours). Accommodation: Wild Camping
Day 3: The Storr to Portree
I woke up to a gray, swirling world of rain and wind. The entire ridge was wrapped in a dense cloud, making everything feel eerie and otherworldly. With a quick cup of coffee and a nearly empty water bottle, I packed up my tent and set off, grateful that my knee was feeling a bit more manageable.

The descent down the ridge was like walking through a ghostly dream. Mist and rain enveloped everything, and I nearly missed the Old Man of Storr itself—only a faint outline in the fog gave it away. It was hard not to feel for the day hikers heading up in the opposite direction, struggling through the mud and barely able to see anything. The haunting atmosphere reminded me of the abandoned village of Boreraig, where the tragic history of forced removal in the 1850s still lingers. When I finally reached the main parking lot, relief washed over me. I made a beeline for the facilities and topped off my water, feeling a bit recharged.

From there, a stretch of road walking helped me loosen up, but it wasn’t long before I was trudging through yet another boggy climb. The mud was relentless, and between the rain, wind, and thick clouds, visibility was nearly zero. I was just trudging along, soaked and battered, with the rain pelting from every direction. It’s clear that in good weather, this stretch must be stunning, but today it was pure survival mode.
As I neared Portree, the clouds finally began to break. I was on a downhill section, which would have been a breeze—if my knee hadn’t decided to act up again. The pain came back with a vengeance, forcing me to hobble slowly and carefully toward town. Originally, I’d planned to camp just past Portree, but with my knee screaming, my clothes soaked, and my energy totally spent, I knew I needed a real bed. After a quick search, I was relieved to find an open bunk in a hostel.

That evening, I threw my clothes in the laundromat to dry, got myself some well-earned pizza, savored a few beers, and soothed my aches with a lineup of whisky sliders. Portree could wait until I had more energy to explore—tonight was all about recovering.
Distance: 18.5km, 700m elevation gain (around 7 hours). Accommodation: Hostel
Day 4: Portree to Sligachan and Beyond
The morning greeted me with surprisingly clear skies, but the forecast warned of intense weather looming over the next few days. I knew I had to cover as much ground as possible today, so I started early, making a quick stop at the local hiking store to grab extra tent pegs, a better pair of socks to nurse my blisters, and a knee brace for the ongoing knee saga.

The first 3 km were promising, a smooth and scenic start, but soon the day turned into a long, steady slog of road walking. For anyone looking to cut down time, here’s a pro tip: if you’re tight on schedule, consider skipping this section. It’s about 10 km of road, with little of the sweeping views I’d grown accustomed to over the past few days. Alternatively, consider taking one of the local boat trips for wildlife viewing opportunities, where you might see white-tailed eagles, puffins, and various marine mammals.

But approaching Sligachan was a bit of a reward, with pretty views and some small river crossings. I rolled into Sligachan by lunchtime and wasted no time stopping at the local hotel for a hearty meal, a couple of beers, and a stock of energy drinks to fuel me up. Already 19 km in, but I wasn’t done yet—I wanted to make the most of the good weather and push on toward Elgol.

Leaving Sligachan, the trail transformed. I found myself trekking through a valley straight out of a fairytale, with lochs nestled between hills and the kind of views that remind you why you came here in the first place. But my body was starting to feel the miles. My knee slowed me down, and the hours crawled by as I trudged on, listening to audiobooks to keep my mind occupied.

Then, almost out of nowhere, dark clouds started gathering on the horizon, swallowing up the valley’s light. I knew I needed to set up camp fast. I found a small, elevated spot near a loch, set up my tent, and braced for the incoming storm. The midges were merciless as the wind died down, so I made the call to skip a hot dinner and instead hunkered down in my tent with snacks. I was too exhausted to care.

When the storm finally hit, it was relentless. I spent the night gripping my hiking stick, the backbone of my tent’s structure, desperately trying to keep it upright against the pounding winds. Sleep was nonexistent. All night, the tent whipped around me, the storm roaring outside. But somehow, as brutal as it was, there was a strange thrill in weathering the storm alone in that wild valley.

Distance: 31.5km, 640m elevation gain (around 10 hours). Accommodation: Wild Camping
Day 5: Sligachan+ to Elgol to Broadford
After a night that seemed to stretch into eternity, the morning finally arrived. I skipped breakfast, desperate to just get moving. I was running on empty, barely held together by sheer determination, with little sleep and every muscle aching. The rain and wind had settled in and promised to stay for the next few days, but at this point, I just had to push through.

The 12 km to Elgol was a blur. In fair weather, I imagine this would be a beautiful stretch, with its winding coastal paths and a campsite by the ocean. But today, it was just me, my tired legs, and the relentless wind. By the time I reached Elgol, I was ready for a break, so I ducked into the local campsite for a quick recharge, filling up on snacks, hot food, and something warm to drink. That brief rest gave me just enough energy to make a final push. It’s important to note that some coastal features, like the Spar Cave, are only accessible during low tide, adding an adventurous element to the journey.

From Elgol, it was one long haul to Broadford. I barely paused to take photos or soak up the views; I was too focused on finishing. Each step was a victory, and each kilometer felt like a battle won. The rain kept hammering down, but with each step, Broadford drew closer.

When I finally stumbled into Broadford, the relief was overwhelming. I secured a bed in a hostel to dry out, rest up, and feel human again. Laundry, a hot fish and chips dinner, and some much-needed relaxation filled the rest of my evening. Outside, the rain kept falling, punctuated by flashes of lightning and rumbles of thunder, but for the first time in days, I could just listen to the storm from a warm, dry place.
Distance: 20km+, 800m elevation gain (around 8 hours). Accommodation: Hostel
Epilogue
Starting the Skye Trail, I was a mix of nerves and excitement. The thought of a solo adventure through the rugged Scottish highlands—a place that feels like one of the world’s last wild frontiers—was irresistible. But I quickly discovered that Scotland isn’t for the faint-hearted. The weather and terrain are unforgiving, demanding a certain mental toughness and resilience to face everything Skye throws your way.
But here’s the thing: anything truly rewarding comes with its share of struggles. I feel incredibly fortunate to have experienced it all—the views that took my breath away, the gritty resilience I had to tap into, and the powerful connection I felt to Skye’s raw beauty and culture. There’s something about a solo journey like this that feels incredibly grounding; it strips everything back and leaves you with just yourself, your limits, and the landscape.
Sure, a solo trek doesn’t need to be this challenging to be soul-enriching! But as tough as it was, this journey has become one of the greatest highlights of my life—a reminder of the strength we discover when we’re out there, truly on our own. Skye, you’ve given me memories I’ll carry forever and lessons that will guide me long after.
Also Read: Rheinsteig Hike Germany Guide
How Hard Is the Skye Trail for Experienced Hikers?
The Skye Trail is no gentle walk in the park—this trek is challenging in every sense. From unpredictable weather to rough, unmarked paths, the trail demands not just physical endurance but a strong mental game, too. For anyone taking this on, it’s a full-body workout mixed with some deep mental resilience training. You’ll need to navigate boggy ground, scramble up rocky sections, and often find yourself waist-deep in mud, all while carrying everything you need on your back.
The toughest part, though, isn’t just the physical exertion. It’s the way Skye humbles you. One minute, you’re basking in stunning views, and the next, a wall of mist rolls in, and you’re in a damp, cold cloud with only a few feet of visibility. Parts of the trail lie in the very shadow of the Cuillin mountains, emphasizing the dramatic and breathtaking landscapes experienced by walkers along the route. You’ll face long stretches with no shelter or clear landmarks—just you, the wild landscape, and the hope you’re on the right path.
So, how hard is it? It’s hard enough to test your limits but rewarding enough to make every step feel worthwhile. This trail is as much about grit as it is about the beauty of solitude. If you’re ready to dig deep, embrace the elements, and surrender to the wild, the Skye Trail will give you an experience you’ll never forget.
How to Train for the Skye Trail?
Training for the Skye Trail isn’t just about building physical strength—it’s about preparing your body and mind for whatever the rugged, unpredictable landscape might throw at you. The landscape itself has been shaped by historical agricultural changes, including profitable sheep farming during the 18th century. Start with stamina. Since this isn’t a short hike but a multi-day trek with serious elevation and often boggy, uneven terrain, try to incorporate long hikes into your weekly routine, aiming to build up to 15-20 km stretches. Throw in some hills or stair climbs to prepare your legs for the endless ups and downs of the trail.

Next up, strength training. A loaded pack is part of the journey, so practice hiking with a backpack to get comfortable with the weight on your shoulders. Strengthening your core, back, and legs through exercises like lunges, squats, and planks will make a world of difference when the climbs get steep or you’re navigating tricky terrain.
And let’s not forget mental endurance. The Skye Trail can be a test of willpower as much as it is of physical grit. One way to train for this? Head out in different weather conditions. Yes, even rain! Get used to staying comfortable when everything around you is uncomfortable—it’s great prep for Skye’s unpredictable weather.
Finally, focus on recovery and resilience. Long, tough hikes can take a toll, so include stretching, foam rolling, and even yoga to keep your muscles flexible and injury-free. Training for the Skye Trail is a journey in itself, but with each step, you’ll be building the strength and resilience to take on one of Scotland’s most stunning (and humbling) trails.
What Accommodations and Wild Camping Are on the Skye Trail?
Accommodations on the Skye Trail are as varied as the trail itself, offering everything from cozy hostels and local B&Bs to wild camping under the stars. Since the trail passes through some remote parts of the Isle of Skye, planning ahead is key.

For a bit of comfort, hostels and B&Bs are available in main hubs like Portree, Broadford, and Sligachan. These spots offer a warm bed, a hot shower, and often a full Scottish breakfast to kickstart the next day’s trek—believe me, it’s hard to beat! Staying in a hostel can also be a social highlight, with the chance to swap stories with other hikers over a well-deserved drink. Many of the abandoned settlements along the trail are a result of the Highland Clearances, adding a poignant historical context to your journey.
If you’re looking to fully embrace the rugged spirit of the trail, wild camping is an option and an adventure in itself. Scotland’s “right to roam” laws allow camping in most wild areas, but there’s a catch: the weather and midges. Setting up your tent in a secluded valley or near a peaceful loch is amazing, but come prepared with insect repellent and gear that can withstand Skye’s unpredictable weather. Some sections, like near Elgol or the Quiraing, are especially beautiful for an overnight stop, with the kind of sunrise views you only get from a tent.
Finally, there are a few campsites in the area, which strike a nice balance between wild camping and more traditional accommodations. Sites like the one in Sligachan offer bathrooms, water sources, and a little more protection from the elements—plus, you’re near the iconic Sligachan Hotel, perfect for a meal and a pint after a long day’s hike.
In short, the Skye Trail has a bit of everything, from rustic hostels to scenic wild camping spots. Each night’s rest becomes part of the adventure, adding to the trail’s unforgettable experience!
How Much Does It Cost to Hike the Skye Trail?
The cost of hiking the Skye Trail can vary widely depending on your style—whether you’re a budget camper or prefer the comfort of a cozy B&B. Here’s a breakdown of the key expenses you might encounter along the way.
First up, accommodation. If you’re camping, you’re in luck; wild camping is free across Scotland (just follow Leave No Trace principles). For those staying in campsites, expect around £10-£15 per night. Hostels and budget B&Bs in places like Portree or Broadford are generally between £20-£50 per night, while a stay in a comfortable B&B might set you back £60-£100. For a bit of extra comfort after a rough day’s hike, it’s totally worth it!
Then there’s food and drink. If you’re planning to eat out occasionally or grab lunch in a pub, budget around £10-£20 per meal. Stocking up at local grocery stores can help you save, especially if you’re camping and cooking your own meals. I found that a combination of supermarket meals, snacks, and the occasional hearty pub dinner was the perfect balance.
Transportation is another consideration. Buses on Skye can be fairly priced but limited, so plan for about £10-£20 for any local bus trips to and from the trailheads. If you’re starting in Inverness, a bus to Portree is roughly £20-£25 each way.
Finally, there are the little extras—like gear updates (I picked up a knee brace and extra tent pegs on the go), coffee stops, or that well-deserved celebratory whisky at the end of a long day. Small indulgences can add up, so it’s wise to set aside a bit for unexpected expenses.
In total, a low-budget trip with camping and groceries could cost around £150-£200 for a week, while a more comfortable journey with hostel stays and a few meals out might range between £300-£500. Hiking the Skye Trail doesn’t need to break the bank, but a bit of planning goes a long way in making the experience as smooth—and memorable—as possible!
It’s also worth noting that the region has seen significant social and economic changes due to more profitable sheep farming, which led to the forced displacement of thousands of people, a painful aspect of Scottish history that is reflected in the abandoned settlements along the Skye Trail.
What Gear Will You Need on the Skye Trail?
Packing for the Skye Trail is all about striking that fine balance between staying prepared and keeping things lightweight—especially because every ounce will feel heavier with each step on this wild and unpredictable terrain! Here’s the gear that made all the difference for me (and a few items I wished I’d had).
Also Read: Best Hiking Backpacks
First, let’s talk about footwear. This trail is boggy, rocky, and often soaked, so sturdy, waterproof hiking boots are non-negotiable. Don’t skimp on breaking them in beforehand; blisters are the last thing you want slowing you down out there. I also packed extra pairs of moisture-wicking socks and, honestly, they were lifesavers—having a dry pair after a boggy section felt like a little piece of luxury.
Also Read: Best Trekking Poles
Next, weather protection is critical. The Isle of Skye has a mind of its own when it comes to weather, and you’ll often experience all four seasons in a day. A good waterproof jacket, waterproof pants, and a pack cover or dry bags to keep everything inside dry are must-haves.
Also read: Best Hiking Rain Jacket
Even on sunny days, I had my rain gear at the ready—it’s just Skye wisdom. Understanding Scottish history can enhance your hiking experience, as the trail is dotted with remnants of abandoned settlements and landscapes shaped by historical events.
Also Read: Best Hiking Boots for Men
Camping? Bring a reliable tent that can withstand wind and rain (trust me, Skye will test it!). A lightweight but durable tent with a good rainfly is essential.
Also Read: Best Hiking Tents
Also, a warm sleeping bag and a quality sleeping mat will be your best friends when the temperature drops at night. For cooking, a compact stove and some ready-to-go meals made things simple, though I admit, there were days I just crashed with a bag of trail mix!
Also Read: Best Hiking Headlamps
Also Read: The Mullerthal Trail Guide
My Personal Tips for Hiking the Skye Trail
Hiking the Skye Trail taught me a lot, and while everyone’s adventure is unique, here are some personal tips that made my journey smoother (or things I wish I’d known sooner!).
Also Read: Hiking Essentials for Beginners
1. Check the Weather Religiously
Skye’s weather can change in minutes—seriously, one moment it’s sunny, the next, you’re in a downpour. I got into the habit of checking the forecast each morning and adjusting my plans when I needed to. Starting a day early because of the weather saved me from being completely drenched on the ridge, so stay flexible and roll with whatever Skye throws at you.
2. Pack for Mud—Lots of It
If you’re picturing pristine trails, think again! The Skye Trail has sections that are boggy enough to swallow your boots whole. Good, waterproof hiking boots (and maybe even gaiters if you don’t mind the extra weight) are essential. And bring extra socks—you’ll thank yourself every time you slip into a dry pair.
3. Don’t Skimp on Navigation Tools
This trail is unmarked, so you’ll be relying on maps, a compass, or GPS. A paper map served me well as a backup when my phone battery started draining, and knowing how to use a compass definitely helps when you’re wrapped in fog and wondering if you’re on the right path. Losing the trail is easy out there, and getting lost is definitely not part of the adventure plan.
4. Embrace the Midge Repellent
Midges are tiny but fierce in Skye, and they come out in full force when the wind drops. A good midge repellent is an absolute must, especially if you’re camping. I learned to put it on early and keep a head net in reach; they may look silly, but you’ll be grateful when the midges swarm.
5. Take Breaks in the Cozy Pubs
The trail takes you through some charming villages with welcoming pubs. I found that a mid-hike pub stop did wonders for my spirit (and my sore legs). A hot meal or a local whisky on a rainy day really lifts the mood, so don’t miss the chance to refuel and soak up the local vibe.
6. Go Slow and Soak It All In
The Skye Trail is stunning, and the journey is as much about the experience as the destination. I made it a point to pause, take in the views, and snap photos whenever I could. The trail has a way of grounding you in the moment, so give yourself the time to appreciate it, even when it’s tough.
7. Prepare for Mental Challenges as Much as Physical Ones
The trail can be lonely and tough, especially if you’re hiking solo. There were moments when I felt exhausted, soaked, and wondered what I was doing out there. But those lows make the highs even better. Remember, this is all part of the adventure, so keep going—it’s worth every muddy, challenging step.
One item I wouldn’t leave home without is a map and compass (or a GPS device). The Skye Trail is unmarked, so you’ll be relying on your navigation skills. Though I used my phone’s GPS, a physical map is invaluable as a backup—don’t underestimate those long, foggy stretches.
Lastly, a few “small luxuries” can make a world of difference. I had a knee brace and a blister kit (absolute lifesavers), and a power bank to keep my phone and drone going. And yes, I’ll admit, a flask of whisky made the cold, rainy evenings a bit more bearable.
Packing for the Skye Trail is like prepping for an adventure that will challenge every part of you. With the right gear, though, you’ll be ready for whatever this wild, beautiful trail throws your way!
Also Read: Tour Du Mont Blanc Guide