Hiking The Boesmanskloof Trail | Self-Guided Complete Guide in Greyton South Africa
Planning a hike but overwhelmed by logistics, gear, or where to start? The Boesmanskloof trail, also known as the Greyton McGregor trail, is one of South Africa’s most scenic routes—but getting all the right details can be confusing. You’re not alone.
This guide solves that.
Whether you’re starting in Greyton or McGregor, hiking one way or returning the same day, we’ll walk you through every step. From route tips and water points to permits and transport—this self-guided guide gives you everything you need to enjoy the Boesmanskloof trail confidently. Let’s get into it.
Also Read: Lago di Sorapis Hike
What Is the Boesmanskloof Trail, South Africa?
If you’ve ever dreamed of stepping into a hidden corner of South Africa that feels untouched, peaceful, and wildly beautiful—this is it.
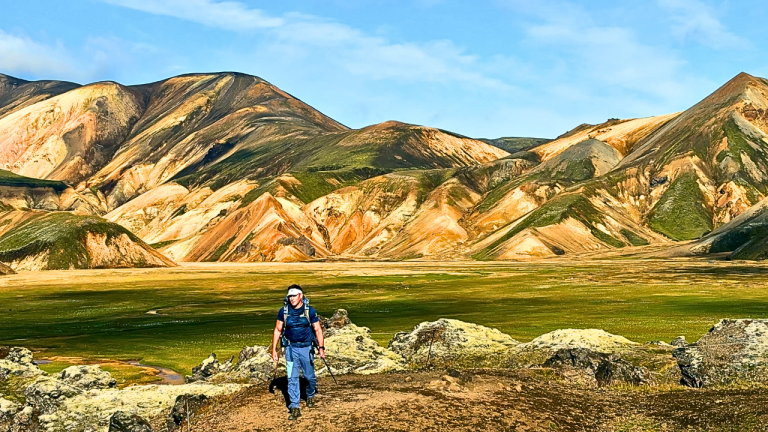
The Boesmanskloof Trail, also called the Greyton McGregor Trail, is a 14km mountain path connecting the quaint villages of Greyton and McGregor in the Western Cape. But it’s more than just a point-to-point hike. It’s a journey through rugged mountain passes, quiet valleys, crystal-clear rock pools, and endless fynbos.
I still remember my first time hiking it. We set off just after sunrise, the morning air cool, the trail empty. Just birdsong, rustling bushes, and the slow unfolding of one stunning view after another. It felt like the kind of place you stumble across in a storybook.
This trail is special because it offers that rare mix of accessibility and escape. No technical climbing. No expensive permits. Just you, your backpack, and one of South Africa’s most rewarding day hikes. And the best part? You can hike it either way—or both, if you’re up for the challenge.
So, what’s the catch? Just a bit of planning. But don’t worry, we’ll cover everything you need in this guide.

Also Read: Wolfberg Arch & Maltese Cross Wild Camping
Route Description and Possible Variations
The Boesmanskloof Trail stretches about 14 kilometers between the charming towns of Greyton and McGregor, weaving through the Riviersonderend Mountains in the Western Cape. Most hikers complete it as a one-way day hike, but there are a few variations depending on your fitness, timing, and travel plans.

Main Route (One-Way)
- Distance: ±14 km
- Elevation gain: ~600m
- Time: 4 to 6 hours (depending on pace and breaks)
- Start point: Either Greyton or McGregor
- End point: The opposite town (you choose your direction)
You’ll pass through fynbos-covered slopes, rocky mountain passes, and peaceful valleys. Expect river crossings, scenic viewpoints, and the highlight—Oakes Falls, a beautiful waterfall and swimming spot roughly halfway.
Also Read: Full Guide to Laugavegur Trail
Option 1: Out-and-Back (Return Hike)
- Distance: 28 km
- Time: 8 to 12 hours (or split over two days)
If you’re up for a full-day challenge or plan to overnight in the mountains, you can hike there and back. Some hikers overnight in one town and return the next day. It’s tough, but incredibly rewarding if your legs (and time) allow it.
Option 2: One-Way with Shuttle
This is the most popular option.
- Start in Greyton, hike to McGregor, or vice versa.
- Book a shuttle service or arrange a lift with friends to return to your car.
- Ideal if you want to enjoy the trail without doubling the distance.
Option 3: Overnight on the Trail
There’s no official campsite, but many hikers wild camp near the river or waterfall (note: this requires experience and discretion). Others book accommodation in McGregor or Greyton before or after the hike.
Which Direction Should You Choose?
McGregor to Greyton: Slightly easier in terms of elevation, but some prefer ending in Greyton for its relaxed village vibe and food spots.
Greyton to McGregor: Slightly more uphill at the start, then a gentle descent. The falls come about halfway, perfect for a lunch stop.
Also Read: Landmannalaugar Hiking Guide
The Boesmanskloof Trail: Our 2-Day Itinerary
As locals from Cape Town we were in the mood for an adventure. So, 3 friends and I packed our backpacks with snacks, layers, and way too many “just in case” items, loaded up the car, and left Cape Town behind. The two-hour drive to Greyton felt like the perfect prelude to what lay ahead. If you’ve never driven that route, picture rolling vineyards, dramatic mountain passes, and sleepy farmlands drifting by like scenes from a slow movie. It’s pure Western Cape magic.

We rolled into Greyton in the late afternoon. It’s the kind of town that instantly makes you exhale—where gravel roads, blooming gardens, and slow conversations over coffee remind you how fast life usually moves. We grabbed a hearty dinner, browsed a local bookshop, and settled into our guesthouse. The next morning, we’d be stepping into the mountains for our overnight hike on the legendary Boesmanskloof trail—also known as the Greyton McGregor trail.
Also Read: Matka Canyon Macedonia Guide
Day 1: Greyton to McGregor (with a twist)
Morning broke with a whisper of rain and chilly mist curling through the hills. It wasn’t ideal hiking weather, but somehow that made it feel more real. We laced up our boots, hoisted our packs, and set off. The first stretch out of Greyton eased us in—lush fynbos on both sides, the sound of trickling water nearby, and the town slowly shrinking behind us.

Then came the first climb.
This is where the Boesmanskloof reminds you that you’re not out for a walk—you’re in the mountains. But even as we huffed our way up to Breakfast Rock, we couldn’t help stopping to admire the views. Mist draped over the hills like a veil. It was moody, wild, and completely hypnotic.

As we continued, the trail twisted through open plains, over rivers, and past ancient rock formations that made you feel tiny in the best way. We took breaks when needed, snapped too many photos, and let ourselves just be out there—without phones buzzing or clocks ticking.
Around midday, we reached Oakes Falls—a thundering waterfall tucked deep in the kloof, with a rock pool perfect for cooling off (though not on this drizzly day). We stayed there longer than planned, eating trail mix and just soaking in the silence.
Also Read: Best Hiking Drones

Also Read: The Rheinsteig Trail Germany
The Final Push: Eagle’s Nest and Beyond
Later in the afternoon, the trail took a turn—upwards. The climb to Eagle’s Nest, our halfway-point overnight stop, was no joke. The path steepens and winds without mercy. Our packs suddenly felt heavier, and conversations died down to determined breathing. But when we crested the ridge, everything opened up.

That view? Worth every step. A full sweep of the valley behind us, the mountains glowing in the soft light of late afternoon. We stood there, quietly grinning, knowing the toughest part was done.
After a few more kilometers, we finally reached our hikers’ cottage—a rustic spot tucked into the mountains, with no electricity, no cell signal, and no distractions. Just the essentials: a fireplace, mattresses, and a braai area.

We dropped our gear, changed into dry clothes, and got a fire going. Beers came out. Dinner sizzled. We shared stories under a sky filled with stars and wind that howled like it had a voice. It was simple, raw, and unforgettable.

Day 2: The Long Walk Back to Greyton
We woke up to the sound of wind rattling the windows and the smell of last night’s fire still lingering in the room. The early morning light filtered through the wooden slats of the hikers’ cottage, casting a soft glow over our scattered gear and sleepy faces. Muscles ached, shoulders complained, but there was something deeply satisfying about waking up in the middle of nowhere—no phones, no alarms, just mountain air and a sense of purpose.

We made a quick breakfast—coffee from a gas stove, oats with trail mix—and packed up our bags. The sky was still grey, threatening rain again, but the wind had calmed down a bit. We stepped outside, took one last look at the view we had all to ourselves the night before, and began the journey back to Greyton.
Walking the Trail in Reverse
It’s amazing how different a trail can feel when you walk it in the opposite direction.
The steep downhill from Eagle’s Nest that had nearly broken us the day before was now a tricky descent with tired legs. Loose rocks and wet soil kept us focused. But once we got past the steeper parts, the trail opened up again—wide paths winding through the valley, surrounded by fynbos and mountains that felt even more alive than the day before.
The weather played the same game. One minute we were shedding jackets in the sun, the next we were zipping them up against a passing drizzle. Still, the variety kept things interesting.
We stopped at Oakes Falls again—this time for a longer break. The sky cleared just enough to let the sun break through, and we sat by the edge of the rock pool, feet dangling in the icy water, eating leftover snacks and chatting about everything and nothing.
The Final Stretch
With about 5 km to go, the group fell into that familiar hiking rhythm—quiet steps, the occasional comment, the shuffle of boots on stone. We didn’t need to talk much. Everyone was in their own little world, reflecting on the weekend, the landscape, the challenge.

And then, just like that, we saw the rooftops of Greyton peeking through the trees.
The last kilometer into town felt surreal. The quiet hum of civilization slowly returned—cars in the distance, people chatting in gardens, the smell of food wafting from nearby homes. We dropped our packs at the car, peeled off our muddy boots, and made a beeline for a café.
Coffee. Real food. A bathroom that didn’t involve squatting behind a bush. Bliss.
Also Read: The Mullerthal Trail, Luxembourg
Looking Back
Two days. Roughly 28 kilometers. Endless memories.
The Boesmanskloof trail isn’t just a hike—it’s a reminder of how much we need time away from the rush, and how satisfying it is to earn your views, your meals, your sleep. Whether you hike it one way or go for the out-and-back experience like we did, it’s a trail that stays with you.
Would we do it again? In a heartbeat.
Just maybe with slightly lighter packs.
Also Read: Fimmvörðuháls Trail Guide

Also Read: The Laugavegur Trail, Iceland
How Hard Is the Boesmanskloof Trail?
Let’s be honest—we asked ourselves this question a lot before the hike. Every blog or site seemed to give a different answer. “Moderate,” some said. “Challenging,” others claimed. But what does that even mean when you’re out there, miles from the nearest town, with a backpack digging into your shoulders?

Now that we’ve done it, here’s the real talk.
If you’re reasonably fit, you’ll be absolutely fine. The Boesmanskloof Trail isn’t a technical hike—no scrambling, no ropes, no dizzying cliff edges. The path is well-marked, the terrain varied but manageable, and there’s no pressure to race. But that doesn’t mean it’s a walk in the park.
On day one, we definitely felt the effort. The initial climb out of Greyton gets your heart rate up, and the trail continues to undulate for most of the 14 km. It’s not flat. You’re either going up or down—sometimes gently, sometimes not. Add a full backpack and unpredictable weather, and you’ll feel it in your legs by the time you hit the halfway point at Oakes Falls.
The final climb to Eagle’s Nest on day one? That was a grind. Steep, exposed, and relentless. With tired legs and heavier-than-necessary packs, we had to stop a few times to catch our breath. That part was hard. But the views from the top? 100% worth it.
Day two felt slightly easier—maybe because we knew what to expect. The descents were tough on the knees, and by the end, our bodies were tired. But in a good way. That earned-it kind of tired.
So how hard is it?
- If you hike regularly, you’ll find it a fun challenge.
- If you’re a casual walker, it’ll push you—but in the best kind of way.
- If you’re new to hiking, it might be tough—but totally doable with breaks and good company.
The key is to pace yourself, pack light, and respect the distance. And remember: part of what makes this trail so memorable is exactly that it asks something of you. You show up, you put in the effort—and it gives back tenfold.
Also Read: Hiking the Rainbow Mountain Peru
How to Train for the Boesmanskloof Trail
You don’t need to be an ultra-marathoner to hike the Boesmanskloof Trail, but a bit of prep goes a long way—especially if you’re carrying a backpack and doing the return hike over two days like we did.

Here’s what helped us feel ready (and not totally wrecked at the end):
- Walk more. Start with local walks or hikes and build up to 10–15 km routes with some elevation.
- Train with weight. Practice with a loaded backpack. Even 6–8 kg makes a big difference over time.
- Work on stairs or hills. The trail has some steep sections—your legs will thank you for doing some uphill training.
- Don’t skip core and balance. Those muscles keep you steady on rocky paths and uneven ground.
We kept our training pretty casual—weekend hikes, lunchtime walks, a few stair sessions. Nothing fancy. But it made the actual trail more enjoyable because our bodies were used to moving.
Bottom line? You don’t need to overthink it—just get moving, build stamina gradually, and break in those hiking boots early.
Also Read: Hiking Ben Nevis Scotland
Where to Stay Around the Boesmanskloof Trail
Planning your hike on the Boesmanskloof Trail? Let’s talk about where to rest those weary legs before and after the trek. Whether you’re starting in Greyton or McGregor, there are some charming spots to consider.

In Greyton:
This picturesque village offers a variety of accommodations, from cozy B&Bs to self-catering cottages. Staying here the night before your hike allows you to soak in the town’s serene atmosphere and perhaps enjoy a hearty meal to fuel up.
On the Trail:
If you’re looking to stay closer to the trail itself, Boesmanskloof – Die Galg Accommodation is a solid choice. Located on the McGregor side of the Riviersonderend Mountains, it offers thatched roof cottages and stone barn units. It’s an ideal spot for hikers wanting to immerse themselves in nature without straying far from the path. boesmanskloofmcgregor.com+3Boesmanskloof – Die Galg Accommodation+3LekkeSlaap+3LekkeSlaap+1LekkeSlaap+1
In McGregor:
After completing the trail, McGregor welcomes you with its rustic charm. Accommodations here range from quaint guesthouses to comfortable self-catering options. It’s the perfect place to unwind, perhaps with a glass of local wine in hand, reflecting on the journey you’ve just undertaken.
Remember, booking ahead is wise, especially during peak hiking seasons. Rest well, and happy hiking!
Also Read: Hiking Ben Lomond Scotland
How Much Does It Cost to Hike the Boesmanskloof Trail?
Planning your hike on the Boesmanskloof Trail involves a few key expenses: permits, accommodation, and additional costs like firewood or shuttle services. Here’s a breakdown based on my experience:
1. Hiking Permit:
- Cost: Approximately R50 per adult per day.
- Where to Obtain: Permits are required and can be obtained through CapeNature.
2. Accommodation:
- On the Trail: Staying at Boesmanskloof – Die Galg Accommodation on the McGregor side is a popular choice. Their thatched roof cottages are well-equipped, offering a comfortable stay after a day’s hike. Prices start at R850 per night for 1-3 people, with incremental increases for larger groups.
- In Greyton or McGregor: Both towns offer a range of accommodations, from guesthouses to self-catering cottages. Prices vary, but you can expect to find options starting around R850 per night for two people.
3. Additional Costs:
- Firewood: If you’re planning a cozy evening by the fire, Boesmanskloof – Die Galg Accommodation offers firewood at R30 per bag.
- Shuttle Services: If you’re hiking one-way, you’ll need to arrange transportation back to your starting point. Shuttle services are available, and costs depend on the provider and distance.
4. Meals and Supplies:
- Self-Catering: Most accommodations are self-catering, so plan to bring your own food and drinks. Both Greyton and McGregor have local shops where you can stock up before your hike.
Estimated Total Cost for a 2-Day Hike:
- Permits: R100 per person (R50/day)
- Accommodation: Approximately R850 per night (for two people sharing)
- Additional Costs: Variable, depending on personal choices like firewood or shuttle services
Remember, these prices are approximate and subject to change. It’s always a good idea to contact the accommodation and permit offices directly for the most current information.
Also Read: The Skye Trail Scotland
What Gear Will You Need on the Boesmanskloof Trail?
Packing for the Boesmanskloof Trail was one of those moments where we had to strike a delicate balance—carry too little, and you’re uncomfortable; carry too much, and your back lets you know real fast.
Also Read: Best Hiking Gloves
If you’re doing the trail as a day hike, you can get away with a light pack. But for an overnight trip like ours, you’ll want to be a little more prepared. Here’s what we found truly essential (and what we wish we’d left behind):

Also Read: Hiking Essentials Checklist
🎒 Essentials We Actually Used
- Comfortable backpack (30–50L) – Enough to fit your gear without overpacking. A hip belt is a lifesaver on long climbs.
Also Read: Best Hiking Backpack
- Hiking shoes or boots – The trail is rocky and uneven in places. Good grip makes a big difference.
Also Read: Best Hiking Boots
- Water (at least 2L) – There are a few natural water sources, but we didn’t take chances. Bring purification tablets if you plan to refill.
- Snacks and meals – Trail mix, sandwiches, instant oats, and a pre-cooked dinner worked well for us. Energy bars came in clutch on the climbs.
- Rain jacket and layers – The weather changed a lot. We went from drizzle to sun to mist in one afternoon.
Also Read: Best Hiking Rain Jacket
- Headlamp or flashlight – Our cottage had no electricity. A headlamp made dinner prep and navigating in the dark way easier.
Also Read: Best Hiking Headlamps
- Power bank – No plug points at the overnight huts. Keep your phone charged if you’re using it for maps or photos.
🏕️ Overnight Add-Ons
- Sleeping bag and pillow – Nights get chilly. Even inside the hut, we were grateful for warm sleeping gear.
- Camp stove and utensils – Essential if you plan to cook (which we did). Don’t forget a lighter!
- Toiletries and towel – Keep it light. Biodegradable soap, toothbrush, and a quick-dry towel did the trick.
- Firewood and braai gear – We brought our own, but firewood can be bought if you’re staying at Die Galg. Braaiing under the stars? Unbeatable.
Also Read: Best Hiking Watches
Things We Packed but Didn’t Really Use
- Too many clothes – One hiking outfit, one for camp. That’s it. The rest just took up space.
Bottom line? Pack light, but smart. The Boesmanskloof trail doesn’t require fancy gear, but a little preparation makes all the difference. You want to enjoy the views—not curse your backpack every time the trail turns uphill.
If in doubt, lay everything out the night before—and then take one or two things out. You won’t miss them.
Also Read: Best Trekking Poles
Also Read: Tour Du Mont Blanc Guide