Alta Via 1 | The Complete Guide
Planning a trek through the Dolomites can be overwhelming. With so many trails, rifugios, and logistics to consider, where do you even begin?
Alta Via 1 is not just a walk—it’s a demanding trek that requires careful preparation and planning to fully enjoy the adventure.
If you’re dreaming of epic alpine views but feel lost navigating maps, hut bookings, and route options, you’re not alone. Many hikers miss out on the best parts of Alta Via 1 due to poor planning or limited information.
This Alta Via 1 guide covers everything you need to know for planning a memorable hiking holiday in the Dolomites—from stages and trail tips to Alta Via 1 accommodation—so you can hike smarter, not harder. Let’s dive in.
Also Read: Makta Canyon, Macedonia Travel Guide
What is the Alta Via 1 Trail in the Dolomites?
The Alta Via 1 (also known as the Dolomite High Route) is a classic long-distance hiking route that winds through the dramatic landscapes of the Italian Dolomites, stretching roughly 120 km from Lago di Braies in the north to La Pissa (near Belluno) in the south. It’s the most popular of the eight “Alta Via” trails, and for good reason.
Here’s what makes it unforgettable:
- Stunning alpine scenery: Expect towering iconic peaks, flower-filled meadows, turquoise lakes, and quiet valleys.
- Well-marked path: The trail is clearly marked and split into daily sections—often 8–10 days depending on your route and pace. Most hikers follow the standard route, which covers the main highlights of the trek.
- Mountain hut comfort: You’ll stay in rifugi (mountain huts) offering meals, beds, and a warm welcome. It’s the perfect mix of adventure and comfort.
- No technical climbing: While steep and rocky in places, this high route is a non-technical trail accessible to most hikers—no ropes, helmets, or mountaineering skills needed.
Whether you’re hiking solo, with a partner, or meeting people along the way (like I did), the Alta Via 1 delivers a journey of challenge, reward, and breathtaking views. This Alta Via 1 guide covers every step of the trail—including Alta Via 1 accommodation options—so you can plan your dream trek with confidence.
Also Read: Hiking Iseltwald, Switzerland
The Alta Via 1 in Numbers
If you’re planning your trek, here’s a quick breakdown of the Alta Via 1—by the numbers. These stats will help you understand the scope of the trail and what to expect along the way.

| Category | Details |
|---|---|
| Total Distance | ~120 km (75 miles) |
| Typical Duration | 8 to 12 days |
| Starting Point | Lago di Braies (1,495 m / 4,905 ft) |
| Finishing Point | La Pissa, near Belluno (490 m / 1,608 ft) |
| Total Ascent | Approx. 6,600–7,000 m (21,650–22,970 ft) |
| Total Descent | Approx. 7,100 m (23,294 ft) |
| Highest Point | Lagazuoi Pass (2,752 m / 9,029 ft) |
| Rifugi (Mountain Huts) | 12–15 options along the main trail |
| Longest Day (avg.) | 20–25 km, depending on itinerary |
| Shortest Day (avg.) | 8–12 km |
| Difficulty | Moderate: non-technical but steep in parts |
| Trail Type | Point-to-point (no circular route) |
| Season | Late June to mid-September (summer season is the optimal time for hiking Alta Via 1) |
Good to know: The trail can be customized—some hikers shorten it, others add side detours or WWI historical sites. You’ll often find yourself adjusting based on weather, accommodation availability, or pure curiosity.
Want to know what each day really feels like? Keep reading for the full day-by-day breakdown.
Also Read: Landmannalaugar Hiking Guide
The Alta Via 1: My 8-Day Journey Through the Dolomites
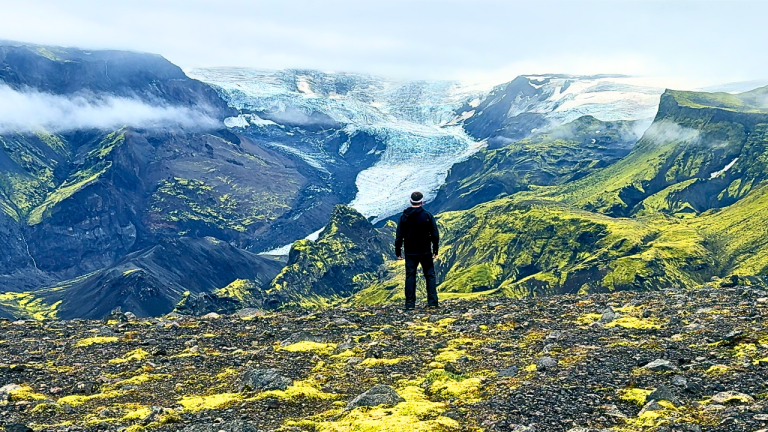
Hiking the Alta Via 1 wasn’t just a trek—it was an unforgettable journey through breathtaking scenery, featuring some of the most awe-inspiring landscapes I’ve ever seen. Over 8 unforgettable days, I crossed rocky passes, lush valleys, and remote rifugi, all under the shadow of the Dolomites’ jagged peaks. Each day brought its own challenge, character, and charm, making the hiking adventure on the Alta Via 1 truly remarkable.
Also Read: Lago di Sorapis Hike

Here’s a personal breakdown of my full itinerary, including distances, elevation changes, trail highlights, and honest reflections from the trail.
Day 1: Lago di Braies → Rifugio Biella
Start of the Journey – A Scenic Lake, a Brutal Climb, and a Quiet First Night in the Mountains

- 🥾 Distance: ~9 km
- ⛰️ Elevation gain: ~800 m
- 🕒 Hiking time: ~3.5 hrs (excluding lake loop)
- 🏔️ Start Elevation: 1,495 m (Lago di Braies)
- 🏔️ End Elevation: 2,327 m (Rifugio Biella)
The adventure begins at the stunning Lago di Braies, where the turquoise waters reflect the dramatic peaks above. As you leave the lakeshore and start the ascent, be prepared for rugged terrain—steep inclines, rocky paths, and uneven ground are common as you climb higher into the Dolomites.
The climb is demanding but rewarding, offering breathtaking views and a true sense of accomplishment once you reach Rifugio Biella for your first night in the mountains.

Overview
Your first day on the Alta Via 1 begins at one of the most photographed lakes in the Dolomites—Lago di Braies (Pragser Wildsee). Don’t rush this part. I arrived around 11:00 AM after catching the bus from Cortina to Dobbiaco, then a connection to the lake. It was hot, and packed with tourists—so I took a short loop walk around the lake before heading up the trail.
Once you leave the crowds behind, the trail starts climbing steeply. Very steeply. The ascent kicks off almost immediately, winding up through rocky terrain toward Forcella Sora Forno, the saddle before Rifugio Biella. This section is challenging—especially in a heat wave—but also incredibly scenic and quiet.
Trail Highlights
- Lago di Braies: Take time to enjoy the views and maybe grab a snack or coffee from the café near the dock.
- First Ascent: Steep, exposed, and rocky. Wear sun protection, and bring plenty of water (there’s no refill point until the rifugio).
- Scenery: You’re quickly rewarded with sweeping alpine views and, as you continue, you’ll pass through lush meadows that add vibrant color and tranquility to the landscape, offering a sense of solitude once you leave the lake behind.
- Pass views: Stop at the pass for a break and panoramic views before the short final descent to the hut.

Rifugio Biella (Seekofelhütte)
- 🛏️ Altitude: 2,327 m
- 🛌 Facilities: Dorm-style rooms, no private rooms
- 🚿 Showers: None
- 🚽 Toilets: One functioning toilet during my stay
- 🍽️ Dinner: 2-course meal (starter + main), large portions, but no dessert
- 💶 Payment: Cash preferred
- 📶 Signal: Limited to none
- 💡 Note: Beds are first-come-first-served; check-in opens at 3:00 PM
My experience: I arrived around 2:00 PM, had a light lunch while waiting for check-in, and enjoyed the peaceful surroundings. Facilities were very basic, but the views were jaw-dropping. Sunset outside the hut was magical. I stayed in a dorm room with a snorer—bring earplugs.
Also Read: Best Hiking Drones
Tips for Booking & Planning
- Booking: Rifugio Biella is not always bookable online. Call or email in advance. Some hikers choose to skip Biella and continue to Rifugio Sennes or Pederü for more comfort, but doing so makes Day 1 much longer.
- Alternative Start Options: Some people stay in Dobbiaco the night before and take the early bus to the lake. Others overnight at Lago di Braies, but hotels here can be pricey and book out quickly.
- Crowds: Start early if possible. The lake gets extremely busy from late morning to mid-afternoon.
- Water: Fill up at the lake. There are no water sources until Biella.
- Trail Conditions: The ascent is exposed—no tree cover. Start early or late if hiking in summer to avoid midday heat.
Is Biella the Right First Stop?
✅ Choose Biella if:
- You want a shorter first day to ease into the hike
- You’re okay with basic facilities
- You want solitude and amazing views
❌ Skip Biella if:
- You want a hot shower, private room, or better food
- You don’t mind a longer, tougher first day to reach Sennes or Pederü
Final Thought:
Day 1 sets the tone for the adventure ahead. It’s short but intense, and that first climb is no joke. But the payoff—quiet trails, stunning scenery, and your first night in the high mountains—is more than worth it. If you’re mentally prepared and well-hydrated, this day can be one of the most peaceful and memorable of your trek.
Also Read: Fimmvörðuháls Trail Guide

Day 2: Rifugio Biella → Rifugio Fanes
A peaceful morning, marmots, a brutal descent, and one of the best rifugios on Alta Via 1
Before setting out, make sure you are well-prepared for a full hiking day with the right gear, comfortable footwear, and enough supplies for the journey ahead.
- 🥾 Distance: ~15 km
- ⛰️ Elevation gain: ~700 m
- ⛰️ Elevation loss: ~900 m
- 🕒 Hiking time: ~6 hours
- 🏔️ Highest point: ~2,327 m (start at Biella)
- 🏔️ Lowest point: ~1,548 m (Rifugio Pederü)
- 🏔️ End elevation: 2,060 m (Rifugio Fanes)
Overview
Day 2 offers variety—from quiet morning solitude to a steep descent into the valley, followed by a tough climb in the afternoon. I left Rifugio Biella at 7:40 AM, trying to get a head start before the heat and crowds. The trail was peaceful early on, and I had long stretches entirely to myself. I even spotted marmots along the way.

Mid-morning, I made a short detour to Rifugio Sennes for coffee and a scenic break—definitely worth the stop. From there, the trail flattened out briefly before plunging down a rugged descent to Rifugio Pederü, nestled in the valley.
After lunch, I tackled the final climb to Rifugio Fanes, about 500 m uphill, and very exposed in the summer heat. It was tough, but arriving at Fanes was a reward in itself—modern comforts, mountain charm, and incredible views.
Trail Highlights
- Early solitude: Leaving Biella early pays off with quiet trails and wildlife sightings.
- Detour to Rifugio Sennes: About 10–15 mins off-trail. Offers food, drinks, and an alternative place to stay.
- Steep descent to Pederü: This section is rocky and can be hard on the knees. Trekking poles help.
- Final climb to Fanes: Exposed and steep in parts, so try to avoid midday sun if possible.
- Alpine meadows near Fanes: The final stretch levels out into wide, grassy plains surrounded by peaks.

Rifugio Fanes
- 🛏️ Altitude: 2,060 m
- 🛌 Facilities: Dormitories, private rooms, and shared rooms available
- 🚿 Showers: Clean, modern, and included in half board
- 🚽 Toilets: Clean and plentiful
- 🍽️ Dinner: Excellent 3-course meal (starter, main, dessert)
- 🍳 Breakfast: Sweet and simple but filling
- 💳 Payment: Accepts cards (but bring cash as backup)
- 📶 Signal/Wi-Fi: Good reception, limited Wi-Fi
- 💡 Atmosphere: Lively yet cozy, lots of hikers and friendly staff
- 💬 Languages: Staff speak German, Italian, and English
My experience: After checking in, I relaxed on the terrace with a drink and chatted with fellow hikers. Dinner was one of the best on the trail. The dorm was spacious and clean, with good mattresses. Hot showers felt amazing after the long climb.

Tips for Booking & Planning
- Booking: Highly recommended. Fanes is a popular hut on AV1 and books up quickly, especially in July and August. Reserve early on their official website or by email.
- Alternative stops:
- Rifugio Sennes – Ideal if you want more comfort than Biella on Day 1.
- Rifugio Pederü – Located at the valley floor; great food and easy to reach by road/bus. Can be your Day 1 endpoint if you want to avoid Biella.
- Water: Refill at Sennes and Pederü. The Fanes plateau has water nearby, but always check availability in dry years.
- Heat warning: The climb from Pederü to Fanes is exposed—aim to do it before 2 PM in hot weather.
- Detour option: If starting the AV1 from Pederü, this can be your first day hike. Easier logistics, parking available, and a shorter transfer compared to Braies.

Is Fanes the Best Rifugio for Night 2?
✅ Choose Fanes if:
- You want comfort, views, and great food
- You’re booking early and want guaranteed space
- You’re okay with a longer, more demanding day
❌ Consider alternatives if:
- You want a shorter day (stop at Pederü)
- You’re behind schedule and need an easier trail section
Final Thought:
Day 2 is the perfect mix of challenge and reward. The long descent and hot climb might push your limits, but arriving at Rifugio Fanes—clean, friendly, scenic—makes it worth every step. With its alpine meadow views and warm hospitality, Fanes easily ranks as one of the top rifugi along the entire Alta Via 1 trail.
Day 3: Rifugio Fanes → Rifugio Dibona
One of the most scenic days on the Alta Via 1—with lakes, sweeping valleys, WWI ruins, and dramatic mountain passes where the route crosses significant historical areas and mountain passes. The trail offers breathtaking views of limestone peaks and dramatic cliffs that define the Dolomites’ rugged landscape.

- 🥾 Distance: ~18 km
- ⛰️ Elevation gain: ~900 m
- ⛰️ Elevation loss: ~950 m
- 🕒 Hiking time: ~7 hours
- 🏔️ Start elevation: 2,060 m (Rifugio Fanes)
- 🏔️ End elevation: 2,083 m (Rifugio Dibona)
- 💬 Trail difficulty: Moderate to challenging due to distance, heat, and steep rocky terrain
Overview
Day 3 is a standout highlight of the Alta Via 1. It starts off gently with peaceful paths across alpine meadows, herds of cows and horses grazing in the distance, and mirror-like lakes framed by jagged peaks. It’s almost too perfect. But don’t be fooled—it becomes much tougher later on.

You’ll face two major climbs: the first is shorter and manageable. The second, leading to Forcella del Lago, is long, steep, and fully exposed—one of the toughest but most rewarding moments on the trail. After the pass, you descend to a gorgeous lake where I stopped for lunch. From there, the trail rises again—rocky, sun-baked, and lined with WWI ruins—before reaching the optional detour to Rifugio Lagazuoi. I skipped it due to storm clouds and continued the scenic traverse towards Rifugio Dibona.
Trail Highlights
- Valley of Fanes: The day starts gently with wide-open spaces, lakes, and silence—perfect for a meditative walk.
- First climb: Gradual ascent with great views.
- Forcella del Lago: A steep, exposed climb to a rocky saddle. This is the toughest section of the day.
- Lago di Lagazuoi: A pristine alpine lake tucked beneath the cliffs—ideal picnic spot.
- WWI sites: Ruins and tunnels from World War I dot the landscape—sobering and fascinating.
- Optional detour to Rifugio Lagazuoi: A popular hut perched at 2,752 m. Requires an additional steep climb (~1 hour).
- Descent to Dibona: Long, dramatic, and framed by towering cliffs.

Rifugio Dibona
- 🛏️ Altitude: 2,083 m
- 🛌 Facilities: Dormitories and some shared rooms (no private en-suite)
- 🚿 Showers: Yes, hot showers included or available with token
- 🍽️ Dinner: Excellent food—arguably one of the best meals on AV1
- ☕ Breakfast: Classic Italian (bread, jam, coffee)
- 💳 Payment: Accepts cash and card (bring backup cash)
- 📶 Signal: Decent reception, limited Wi-Fi
- 💡 Atmosphere: Social and relaxed, popular with climbers and hikers
- 🚗 Accessibility: Reachable by car via a mountain road—rare for Alta Via 1 huts
My experience: I arrived just before a thunderstorm rolled in—great timing. Dinner was one of the tastiest I had all week, and the dorms were clean and spacious. The location isn’t as remote as some rifugi, but the surrounding mountains still steal the show.

Tips for Booking & Planning
- Booking: Recommended in peak season. Dibona is accessible by road, making it popular with both AV1 hikers and day visitors. You can book via their website or email.
- Lagazuoi alternative: Some hikers end Day 3 at Rifugio Lagazuoi instead of Dibona. It’s more remote, higher in altitude (2,752 m), and includes a cable car option down the next day. Pros: insane views and WWI tunnel access. Cons: extra 1+ hour of steep ascent, very popular.
- Weather warning: This stage is very exposed. Start early and check the forecast—afternoon storms are common.
- Water availability: Fill up at Fanes and again at Dibona. There may be streams en route, but don’t count on them in dry months.
- Packed lunch: Rifugio Fanes can prepare a lunch to-go—ideal for eating at Lago di Lagazuoi or along the ridgeline.
Should You Stay at Dibona or Lagazuoi?
| Rifugio Dibona | Rifugio Lagazuoi | |
|---|---|---|
| Elevation | 2,083 m | 2,752 m |
| Access | Road access | Cable car or steep hike |
| Atmosphere | Cozy & accessible | Iconic & exposed |
| WWI Tunnels | Nearby but not adjacent | Direct access |
| Food | Excellent | Good but more touristic |
| Crowds | Busy with locals & climbers | Very popular with tourists |
Final Thought:
This was my favorite day on the Alta Via 1. The changing scenery—from peaceful meadows to wild rocky passes and historical landmarks—captures everything that makes this trek magical. It’s challenging, yes, but deeply rewarding. Just make sure to check the weather, book your rifugio early, and take time to soak in those panoramic views—they’ll stay with you long after you’ve left the trail.
Day 4: Rifugio Dibona → Rifugio Passo Staulanza
The longest day of the trek—early starts, epic views, technical descents, and an afternoon thunderstorm chase

- 🥾 Distance: ~22 km
- ⛰️ Elevation gain: ~1,100 m
- ⛰️ Elevation loss: ~1,300 m
- 🕒 Hiking time: 8–9 hours (without long breaks)
- 🏔️ Start elevation: 2,083 m (Rifugio Dibona)
- 🏔️ End elevation: 1,783 m (Rifugio Passo Staulanza)
- 💬 Trail difficulty: Challenging—due to distance, exposure, and technical sections
Along the way, you’ll pass several rifugi, including a scenic stop at Rifugio Coldai, which offers panoramic views of Lago Coldai and the surrounding peaks. If you’re seeking a more demanding experience, there is an alternative route around Monte Pelmo featuring a more exposed section with iron cables, as well as options to bypass the main trail and stay at Refugio Venezia before rejoining the main route at Malga Pioda.
Overview
Day 4 was the longest, most physically demanding day of my Alta Via 1 trek—but also one of the most rewarding. I started at 5:30 AM, catching cool morning air and golden sunrise views. The path winds through alpine terrain, gradually ascending and descending past multiple rifugi, steep valleys, panoramic ridgelines, and a technical rocky descent later in the day.

Storms are common in the afternoon here, and that was true for me. Thunder rumbled overhead as I crossed a final pass and I had to take shelter before continuing to Rifugio Passo Staulanza, which sits next to a mountain road. While not the most remote rifugio, it has excellent amenities and served as the perfect rest stop after a grueling day.
Trail Highlights
- 🌄 Early Start: The trail from Dibona is magical in the early light. You’ll likely be alone, and the air is fresh and quiet.
- 🧭 Scenic Ridgelines: Long stretches with panoramic views across the valleys. Great photo spots.
- 🏞️ Rifugios en route:
- Rifugio Col Gallina – Small café hut with snacks.
- Rifugio Averau – Highly recommended for a mid-morning coffee or cake.
- Rifugio Nuvolau (optional) – Perched dramatically on a rocky summit. A worthy detour with 360° views.
- Rifugio Città di Fiume – Possible lunch stop. Quiet, less frequented.
- 🧗♀️ Technical descent: A rocky and steep section before Passo Staulanza requires focus and trekking poles.
- ⚡ Afternoon storms: Thunder and rain are common after 2 PM. Plan accordingly.
Rifugio Passo Staulanza
- 🛏️ Altitude: 1,783 m
- 🛌 Facilities: Dormitories and private rooms available
- 🚿 Showers: Modern, hot showers included
- 🧺 Laundry: Laundry service and drying area available (rare on the AV1!)
- 🧖 Wellness: Some rooms offer spa access (call ahead)
- 🍽️ Dinner: Generous portions, tasty regional cuisine
- 🥐 Breakfast: Varied buffet with sweet and savory options
- 💳 Payment: Cards accepted
- 📶 Signal/Wi-Fi: Strong signal and decent Wi-Fi
- 🚗 Access: Roadside location, accessible by car
My experience: Despite being right on a road, I was glad to stay here. The staff were welcoming, the food was excellent, and the facilities felt luxurious after the long day. No snorers in the dorm either—huge bonus.
Tips for Booking & Planning
- Booking: Highly recommended in peak season. This rifugio is accessible by road, so it fills up with both AV1 hikers and car travelers. Reserve early via their website or email.
- Lunch Planning: Start early and aim for Rifugio Averau or Città di Fiume for lunch or extended breaks. They break up the day nicely and offer good food.
- Alternate stop: If 22 km feels too much, consider staying overnight at Rifugio Averau or Nuvolau and splitting this day into two. However, these have limited space and require very early booking.
- Weather strategy: The latter half of the route is exposed. Aim to finish by 2–3 PM to avoid storms. Bring a waterproof jacket and know where nearby rifugi are for emergency shelter.
- Trekking poles: A must for the long rocky descent.
- Navigation: Follow Alta Via 1 red-white trail markers, but double-check at intersections—especially when tired near the end of the day.
Should You Do the Full Stretch or Break It Up?
| Full Day (Dibona → Staulanza) | Split Day (e.g. stop at Averau) | |
|---|---|---|
| Pros | Keeps itinerary on track, great endurance test, option to complete the full route in one day | Shorter, easier pace |
| Cons | Long and exhausting, risk of late-day storms | Requires early booking & detours |
| Recommended for | Fit hikers starting early & used to distance, those aiming to hike the full route in a single stretch | Hikers preferring more time & less strain |
Final Thought:This is the day that tests your stamina and planning. Start early, fuel up at the rifugi along the way, and enjoy the wild beauty of the Dolomites as the landscape transforms throughout the day. If you want to experience the full route in one go, this is your chance. Despite the storm chasing me into Staulanza, this was one of the most fulfilling stages of the Alta Via 1 guide. Just be ready—it’s a long one.
Day 5: Rifugio Passo Staulanza → Rifugio Vazzoler
A shorter day through forests, a challenging uphill, and remote mountain solitude with some of the best views on the Alta Via 1. Along the way, consider a scenic detour or stop at Rifugio Tissi, known for its stunning location near Col Reàn and Lago di Alleghe, offering impressive views of Civetta and the surrounding peaks. After reaching Rifugio Vazzoler, hikers looking to continue further can head towards Rifugio Carestiato, a welcoming mountain refuge and key waypoint nestled amidst rugged terrain, perfect for those extending their journey.

- 🥾 Distance: ~13 km
- ⛰️ Elevation gain: ~700 m
- ⛰️ Elevation loss: ~650 m
- 🕒 Hiking time: ~5 hours (moderate pace)
- 🏔️ Start elevation: 1,783 m (Passo Staulanza)
- 🏔️ End elevation: 1,714 m (Rifugio Vazzoler)
- 💬 Trail difficulty: Moderate—steady uphill sections, less technical overall, but tiring due to heat
Overview
After the long effort of Day 4, Day 5 felt refreshingly manageable—although it wasn’t without challenges. The morning kicked off with an easy, shaded walk through wooded areas with limited mountain views. After this gentle start, the trail soon shifted into a steady and somewhat strenuous climb, emerging from the trees into more open terrain and breathtaking alpine scenery.

The latter part of the trail featured some narrow, rocky paths where you had to be careful with your footing. This stage is less crowded than earlier days, giving a feeling of remote wilderness. Arriving at Rifugio Vazzoler was a true reward—it’s isolated, rugged, and offers striking views of dramatic peaks and cliffs.
Trail Highlights
- 🌲 Forest trails: A welcome shaded section early in the day to ease tired legs.
- 🥾 Long uphill climb: Slow and steady ascent to Forcella Col Dell’Orso. Take your time—especially if it’s hot.
- 🌄 Scenic viewpoints: Once above the treeline, the views of surrounding peaks, including the spectacular Torre Venezia, are phenomenal.
- 🌺 Wildlife and flora: This quiet stretch is excellent for spotting alpine flowers, birds, and even deer.
- 🛖 Remote rifugio experience: Vazzoler is less visited, giving you an authentic and quieter Dolomites experience.
Rifugio Vazzoler
- 🛏️ Altitude: 1,714 m
- 🛌 Facilities: Dormitory-style rooms only (no private rooms)
- 🚿 Showers: Limited availability, paid showers (~5 EUR, timed)
- 🚰 Water: Limited supply due to remote location; refill water bottles cautiously
- 🍽️ Dinner: Good but simple fare—typical mountain hut meals
- ☕ Breakfast: Basic but sufficient (coffee, bread, jam, cereal)
- 💳 Payment: Cash only, bring enough Euros
- 📶 Signal: Very limited to no reception, no Wi-Fi
- 💡 Atmosphere: Rustic, authentic mountain vibe, peaceful—true to the experience of staying in rustic mountain huts, with a cozy, no-frills charm.
- 💬 Staff: Friendly, helpful, and welcoming despite remote logistics
My experience: This was a fantastic stop because it felt truly isolated. Facilities were basic and resources limited (especially water and showers), but the views and genuine mountain hut experience compensated completely. Conversations with fellow hikers were memorable, adding a unique charm to the evening.
Tips for Booking & Planning
- Booking: Highly recommended, even though this rifugio is less busy. Its limited capacity means you should reserve at least 2 months in advance, especially in peak season. Book directly via phone or their website.
- Water conservation: Due to limited water resources, showers are timed and charged separately. Bring wet wipes for backup.
- Food considerations: Dinner and breakfast are simple but filling. If you have dietary restrictions or need more snacks, carry extras.
- Mosquito repellent: Summer evenings here can attract insects—bring bug spray.
- Navigation caution: Trails after the wooded sections become rocky and narrow. Watch trail markers closely and have an offline map ready.
- Cash: No card payments—ensure you have enough Euros.
Should You Stay at Vazzoler or Continue Further?
| Stay at Vazzoler | Continue Further (e.g., Rif. Carestiato) | |
|---|---|---|
| Pros | Remote and quiet experience, easier day after Staulanza | Shortens next day, better facilities |
| Cons | Limited facilities, no Wi-Fi, minimal showers | Longer and more strenuous day |
| Recommended for | Hikers wanting an authentic remote rifugio experience | Hikers looking for more comfort and shorter subsequent day |
Final Thought:
Day 5 on the Alta Via 1 is about shifting gears—less intense physically than Day 4 but still requiring steady determination. The reward of Rifugio Vazzoler’s solitude, incredible scenery, and genuine mountain-hut atmosphere makes it a memorable highlight. Just remember to plan ahead, book early, conserve water, and embrace the simplicity of this beautifully remote spot.
Day 6: Rifugio Vazzoler → Rifugio San Sebastiano
A technical and rocky day with navigation challenges, a special meeting, and a charming rifugio with private rooms
- 🥾 Distance: ~10 km (plus detours)
- ⛰️ Elevation gain: ~600 m
- ⛰️ Elevation loss: ~500 m
- 🕒 Hiking time: ~4.5 to 5 hours
- 🏔️ Start elevation: 1,714 m (Vazzoler)
- 🏔️ End elevation: 1,030 m (San Sebastiano)
- 💬 Trail difficulty: Moderate to challenging, due to rocky terrain and tricky navigation
Tip: For overnight stays in basic huts or rifugios, be sure to bring your own sleeping bags or liners, as some accommodations may only provide blankets. Lightweight sleeping bags are especially useful for hut-to-hut trekking in the Dolomites.

Overview
Day 6 was one of the more technical and navigation-intensive stages of the Alta Via 1. I started early after a solid breakfast, partly because I was meeting a friend, Aneta, which added a meaningful detour to the day.
From Rifugio Vazzoler, the trail descends quite a bit before climbing back up to rejoin the main path. The terrain is rocky, uneven, and at times steep. There are some tricky sections that demand attention, so good hiking boots and poles are essential. Navigation requires focus—trail markers can be sparse or faded in spots.
Eventually, we reached Rifugio San Sebastiano, which, while close to a road, felt welcoming and charming. This rifugio stands out on the Alta Via 1 because it offers private rooms with en-suite bathrooms—a rare treat after several nights in dorms.
Trail Highlights
- 🦌 Scenic detours: The route offers beautiful forested sections and mountain views but requires careful navigation.
- 🗺️ Navigation challenge: This day demands map reading and attention to markers. An offline GPS app or physical map is recommended.
- 🥾 Rocky and technical paths: Be ready for uneven ground and some scrambling.
- 👋 Meeting point: For me, meeting Aneta made the day extra special and motivating.
- 🏡 Rifugio San Sebastiano: A comfortable stop with private rooms and friendly staff—perfect for relaxing after a technical day.
Rifugio San Sebastiano
- 🛏️ Altitude: 1,030 m
- 🛌 Facilities: Private rooms with bathrooms, dormitories also available
- 🚿 Showers: Private bathroom showers in rooms, clean and modern
- 🍽️ Dinner: Simple but hearty mountain meals
- ☕ Breakfast: Standard continental-style
- 💳 Payment: Cash and card accepted
- 📶 Signal/Wi-Fi: Good reception, limited Wi-Fi
- 💡 Atmosphere: Friendly, relaxed, quieter than busier rifugi
- 🧳 Extras: Proximity to road makes resupply or exit easier
My experience: This was a welcome change of pace and comfort. The private room was a luxury, allowing a restful night and a chance to freshen up properly. The staff were warm and I enjoyed meeting other hikers and some fellow South Africans.
Tips for Booking & Planning
- Booking: Highly recommended, especially for private rooms. San Sebastiano is popular among hikers who want a bit more comfort. Book via their official site or by phone well in advance.
- Navigation tools: Carry a detailed map, offline GPS app, or guidebook. Markers are sometimes unclear or missing.
- Footwear: Solid hiking boots with good grip are essential for rocky sections.
- Time management: Start early and allow time for detours and slow navigation.
- Resupply option: Since the rifugio is near a road, it’s easier to access local shops or arrange transport if needed.
- Meetups: If hiking with friends or meeting contacts on the trail, this rifugio makes a good rendezvous point.
- Cash: Although cards are accepted, it’s wise to bring some cash, especially for smaller purchases.
Should You Choose San Sebastiano?
✅ Choose this rifugio if:
- You want a break from dorms with private rooms and showers
- You value a quieter, friendly atmosphere
- You want an easy resupply point or an exit option
❌ Consider alternatives if:
- You want a more remote, traditional mountain hut experience
- You’re on a tight budget (private rooms come at a premium)
Final Thought:
Day 6 challenges your trail skills with rocky terrain and navigation, but it rewards you with a comfortable, restful night at Rifugio San Sebastiano. This stop feels like a small oasis after several demanding days and offers a taste of comfort without losing the mountain atmosphere. Prepare for the tricky sections, book early, and enjoy the balance of adventure and relaxation.
Day 7: Rifugio San Sebastiano → Rifugio Pramperet
- Distance: ~15 km (varies slightly depending on route)
- Elevation Gain: ~350 m
- Elevation Loss: ~1,200 m
- Time: 6–7 hours
- Difficulty: Moderate to Challenging (long descent, some slippery/rocky sections)
- Overnight: End of trek – transfer or accommodation in valley (e.g., Agordo, Belluno, or back to Cortina)
🗺️ Trail Description
Your final day on the Alta Via 1 begins from the cozy Rifugio Pramperet. After a warm breakfast (usually served at 7:00 AM), the trail starts with a gentle ascent before a long and scenic descent through the Val Pramper. The early section passes through high alpine meadows and rocky ridgelines with panoramic views back toward the rugged Dolomite peaks you’ve spent the week crossing.
As you descend:
- You pass Casera Pramper, a rustic farm building in a large pasture – a good rest spot.
- The trail enters denser forest, and the path becomes more shaded and serene.
- Expect rocky, uneven terrain and a steep descent, which can be hard on the knees – hiking poles are a big help here.
Eventually, you’ll reach the forest road and then the trailhead at Pian de la Fopa, where some people arrange pickup. Others continue on foot for another ~30 minutes to La Pissa parking lot (often the official endpoint) or even further to Forno di Zoldo, where public transport may be more reliable.
Also Read: The Mullerthal Trail Guide
🚐 Getting Back – Transport Options
Because this is not a circular route, planning your exit is essential:
Public transport is reliable and widely used by trekkers. After finishing the trail, a bus ride from the endpoint to Belluno or other nearby towns is a convenient option. From Belluno, you can easily connect to trains or buses for onward travel.
For international travelers, there are direct connections from Belluno to Venice airport, making it straightforward to continue your journey home or to your next destination.
Also Read: Matka Canyon Guide
🅿️ La Pissa (Car Park)
- If you arranged luggage transport or someone is picking you up, this is the ideal location.
- Some private shuttles offer pickup here with pre-booking (especially in peak season).
🚌 Public Transport
- Forno di Zoldo is the nearest village with some bus connections to Longarone or Belluno.
- From Belluno, you can reach Cortina, Venice, or Treviso via train or Flixbus.
🚕 Taxi
- If no buses are running (especially shoulder season or weekends), arrange a taxi in advance from Forno or Belluno.
- Estimate €40–€70 depending on destination and time of day.
🛏️ Where to Stay After Finishing
Depending on your post-hike plans:
- Cortina d’Ampezzo (via taxi or bus): Good base if you want to unwind or continue exploring the Dolomites, with a range of luxurious hotels available for those seeking premium comfort after the trek.
- Agordo or Belluno: Quieter towns closer to the endpoint, offering hotels and train access.
- Venice or Treviso: For those flying out the next day.
🍝 Food & Water Tips
- Rifugio Pramperet offers a packed lunch for the final day—recommended, as there are no food options until the valley.
- Water sources are limited – fill up at the rifugio before leaving.
📅 Booking & Planning Tips
- Rifugio Pramperet can be booked via email (found on their official website). It fills up during the high season (July–September), so book well in advance and make sure to plan all the details for a smooth hiking experience.
- Some trekkers combine Day 6 and 7 into one long push if short on time, but staying at Pramperet makes for a more enjoyable, relaxed final day.
- If using luggage transport, confirm with your provider if they deliver to La Pissa or nearby Forno di Zoldo. Not all services go this far south.
💡 Pro Tips
- Start early to avoid hiking in the hottest part of the day.
- Plan your exit BEFORE you arrive—cell signal is limited in the forest, and taxi availability is hit or miss.
- Identify easy escape routes along your hike in advance, so you know where you can leave the trail quickly and safely in case of emergency or bad weather.
- Consider leaving a change of clothes or recovery shoes in your transport pickup vehicle or destination hotel.
Day 8: Rifugio Pramperet → La Pissa (bus stop)
An epic and emotional finale—sunrise over rugged peaks, a cold and windy pass, and a satisfying descent to the end of the trail. The southern part of the Alta Via 1 offers distinctive scenery and unique challenges, with dramatic landscapes and a sense of accomplishment as you complete the final section.

- 🥾 Distance: ~14 km
- ⛰️ Elevation gain: ~450 m
- ⛰️ Elevation loss: ~1,200 m
- 🕒 Hiking time: ~5.5–6 hours
- 🏔️ Start elevation: ~1,857 m (Rifugio Pramperet)
- 🏔️ End elevation: ~490 m (La Pissa bus stop)
- 💬 Trail difficulty: Moderate – a steep, windy climb in the morning followed by a long descent through varied terrain
Overview
Day 8 is bittersweet—the final stretch of the Alta Via 1. It begins with a dramatic early morning climb over a scenic pass, followed by a long descent through alpine meadows and into lower-altitude forest. You’ll want to start early—both to catch incredible morning light and to ensure you make it to La Pissa in time for the bus (especially if bad weather is forecast).

This day may be your last physical challenge, but emotionally it’s big. After over a week in the Dolomites, the sense of completion hits hard—especially when those first signs of civilization reappear in the valley.
Trail Highlights
- 🌄 Alpine sunrise: We started at 6:00 AM, and the lighting during the climb was unforgettable—orange peaks, misty valleys, and absolute silence.
- ❄️ Mountain pass: The final pass was cold, windy, and wild—but one of the most beautiful of the trek.
- 🥐 Breakfast with a view: We paused mid-morning with a packed snack and panoramic views—one last alpine breakfast.
- ☕ Coffee stop: Later, we reached a lower-elevation rifugio for a warm coffee—a welcome reward before the final push.
- 🌲 Forest section: The final hours are shaded, easier on the knees, and peaceful.
- 🚌 La Pissa bus stop: Well-marked, but unstaffed. There’s a small parking area and bus shelter, and signs indicating the final Alta Via 1 endpoint.
End Logistics – Getting From La Pissa to Belluno
- 🚌 Bus schedule: Buses run from La Pissa → Belluno a few times per day. Schedules vary by season—check in advance on the Dolomitibus website or ask at your previous rifugio.
- ⏱️ Best to arrive early: If you miss the bus, you’ll need to arrange a taxi (~€40–50 to Belluno).
- 🎒 No shops or cafés: La Pissa is a bus stop, not a village. Have water and snacks for the wait.
- 🏙️ Belluno: A charming town to rest, grab a celebratory meal, and catch a train onward. Trains connect to Venice, Bolzano, and beyond.
Tips for Booking & Planning
- Wake up early: We left just after sunrise. It was cold and windy but worth it for the quiet trails and guaranteed arrival before the afternoon storms or tight bus schedules.
- Check bus times the night before: Ask Rifugio Pramperet staff for up-to-date info or screenshot the schedule online.
- Wear layers: The pass in the morning can be very cold and windy, even in mid-summer.
- Trekking poles: Helpful for the long, knee-heavy descent.
- Fuel up: Rifugio Pramperet’s breakfast is basic. Bring something extra—bars, fruit, or a sandwich.
- Celebration plan: Consider staying in Belluno for the night—there are hotels, restaurants, and great gelato spots.
What to Expect Emotionally
✅ Satisfaction: You’ve completed one of Europe’s most iconic hut-to-hut hikes. That’s no small feat.
😢 Bittersweet goodbye: The moment you hear road noise again, it hits—you’re done. Take a moment at the finish to reflect.
📸 Photo moment: Capture your group or solo shot at the trail sign near the bus stop—it’s your AV1 finish line.
Final Thoughts
Day 8 wraps up the Alta Via 1 with a perfect mix of challenge, solitude, and closure. From the cold wind at the pass to the quiet walk into the forest, it’s a fitting end to a powerful journey. Plan your logistics, pack some extra snacks, and take time to appreciate how far you’ve come. Because once you step off that bus in Belluno… you’ll already be missing the trail.
Alternative Start and End Points on the Alta Via 1
Customize your trek to match your time, fitness, or travel plans
While most hikers complete the full Alta Via 1 from Lago di Braies to La Pissa (near Belluno) over 8–12 days, you can absolutely shorten or adapt the route without missing its beauty. Here are popular alternative start and end points to help you build a custom itinerary. Note that some options, like starting or ending in Cortina, are off route and will require extra navigation or planning.
Alternative Starting Points
1. Rifugio Pederü (Start at Day 2)
- 📍 How to get there: Accessible by bus or car via San Vigilio di Marebbe
- ⏱️ Duration: 6–8 days to finish
- ✅ Why start here:
- Skips the tough Day 1 ascent from Lago di Braies
- More comfortable first night (hot showers, better food)
- Easier logistics if you’re already in South Tyrol
2. Rifugio Fanes (Start at Day 3)
- 📍 How to get there: Hike in from Pederü (2–2.5 hrs uphill)
- ⏱️ Duration: 5–7 days
- ✅ Why start here:
- Ideal if you’re time-limited
- Start with a comfortable rifugio and stunning scenery
- Avoid crowds at the trailhead
3. Rifugio Lagazuoi or Passo Falzarego
- 📍 How to get there: Bus from Cortina d’Ampezzo to Passo Falzarego, hike or cable car to Lagazuoi
- ⏱️ Duration: 4–6 days
- ✅ Why start here:
- Good for those short on time but still want dramatic views
- Includes WWI tunnels and high-altitude exposure
- Skip earlier long stages and start strong
Alternative Ending Points
1. Rifugio Vazzoler (End after Day 5)
- 📍 Exit via: Trail to Capanna Trieste → Bus to Agordo
- ⏱️ Duration: ~5 days total
- ✅ Why end here:
- You’ve completed the most scenic northern and central sections
- Easier escape point before the trail becomes more remote
- Good if you have only 1 week
2. Rifugio San Sebastiano or Duran Pass
- 📍 Exit via: Road access at Passo Duran
- ⏱️ Duration: ~6 days total
- ✅ Why end here:
- Can arrange pickup or take a bus to Belluno
- Offers a natural break point between sections
- Nice mix of scenic and quiet terrain
3. Rifugio Pian de Fontana (Near End)
- 📍 Exit via: Steep descent to Longarone or taxi to Belluno
- ⏱️ Duration: 7–8 days
- ✅ Why end here:
- Almost full trail, but avoids the long forested descent to La Pissa
- Easier logistics if you’re pressed for time
Why Customize the Alta Via 1?
- ⏱️ Limited vacation time
- 💪 Avoid physically demanding or less scenic sections
- 🚐 Easier transport logistics
- 🎒 Lighter pack and fewer hut bookings
- 👣 First-time hut hikers easing into multi-day treks
Many people choose to hike Alta Via 1 in different ways, including both self-guided and guided options, depending on their preferences and experience. Opting for a self guided Alta Via 1 trip offers flexibility and independence, allowing you to customize your route, book your own accommodations, and set your own pace through the Dolomites.
Quick Reference: Custom Itineraries
| Route | Days | Highlights |
|---|---|---|
| Lago di Braies → Lagazuoi | 3–4 | Scenic north, avoids tough logistics |
| Pederü → Vazzoler | 5–6 | Beautiful middle section with good access |
| Lagazuoi → La Pissa (Full South) | 5–6 | Quietest and most remote part of AV1 |
| Lagazuoi → Passo Duran | 4–5 | Perfect mid-length hike with WWI history |
Final Thought
The Alta Via 1 is flexible—you don’t need to hike the full trail to have a full experience. Whether you’re short on time, want a more relaxed pace, or are traveling with less experienced hikers, these alternate entry and exit points give you the freedom to tailor your journey and still enjoy some of the best alpine views in Europe.
Alta Via 1 Accommodation Guide
Where to stay before, during, and after your Dolomites adventure
Finding the right accommodation is key to a smooth and enjoyable Alta Via 1 experience. Whether you’re looking to book comfortable stays before you hit the trail, cozy rifugi during your hike, or a hotel to relax after finishing, this guide has you covered.

Staying in rifugi not only provides shelter but also offers a unique opportunity to experience the local culture of the Dolomites through interactions with staff and fellow hikers, from multilingual conversations to sampling traditional cuisine.
Before the Trail – Where to Stay Before Day 1
Most hikers start the Alta Via 1 at Lago di Braies, but getting there usually requires a stay the night before in a nearby town.
🛏️ Top Options:
| Location | Why Stay Here | Examples |
|---|---|---|
| Dobbiaco | Closest town with transport links and amenities | Hotel Stauder, Hotel Union, Casa Monte |
| Villabassa | Small and charming village, quieter than Dobbiaco | Adler Historic Guesthouse, Pension Vitalhof |
| Lago di Braies | Right at the trailhead—but very limited & pricey | Hotel Lago di Braies (must book early!) |
| Cortina d’Ampezzo | Larger town, more restaurants, transit to trailhead | Hotel Panda, Hotel Meublè Royal |
Tip: Book at least 2–3 months in advance, especially in July–September. Dobbiaco and Villabassa offer easy morning bus connections to Lago di Braies.
During the Trail – Rifugi on the Alta Via 1
You’ll stay in mountain huts (rifugi) every night. These range from basic dorm-style refuges to more comfortable huts with private rooms and showers. Most include half board (dinner + breakfast), and some offer packed lunches.

Need-to-Know About Rifugi
- Book early (2–3 months ahead in high season)
- Most accept email or phone reservations
- Cash is still preferred or required in some huts
- Bring sleeping bag liner, earplugs, and headlamp
- Half board is typically €60–80/night
🏔️ Popular Rifugi Along Alta Via 1:
| Stage | Rifugio Options |
|---|---|
| Day 1 – Lago di Braies → Biella | Rifugio Biella, Rifugio Sennes (alt), Rifugio Pederü (alt) |
| Day 2 – Biella → Fanes | Rifugio Fanes |
| Day 3 – Fanes → Dibona | Rifugio Lagazuoi (alt), Rifugio Dibona |
| Day 4 – Dibona → Staulanza | Rifugio Averau (alt), Rifugio Città di Fiume (alt), Rifugio Passo Staulanza |
| Day 5 – Staulanza → Vazzoler | Rifugio Vazzoler |
| Day 6 – Vazzoler → San Sebastiano | Rifugio San Sebastiano |
| Day 7 – San Sebastiano → Pramperet | Rifugio Pramperet |
| Day 8 – Pramperet → Finish | Rifugio Pian de Fontana (alt), Bar da Flora (near end) |
Tip: Use map overlays (e.g., Komoot, AllTrails, Tabacco maps) to spot alternate rifugi or bail-out points in case of weather or injury.
After the Trail – Where to Stay Post-Hike
Most people finish the trail at La Pissa, near Belluno, where buses run into town. After eight days on the trail, you’ll want a proper bed, a shower without a coin timer, and maybe some pizza and prosecco.

🛏️ Where to Stay in Belluno
| Hotel | Highlights |
|---|---|
| Albergo Cappello e Cadore | Historic hotel in Belluno’s old town |
| Hotel Europa Executive | Modern, comfortable, near the train station |
| B&B Giardini dell’Ardo | Scenic, quiet, perfect for post-trail recovery |
🚉 Getting Onward From Belluno
- Train connections to Venice, Verona, or Bolzano
- Local bus to other Dolomite towns or back to Cortina
- Taxi or transfer services available if buses don’t align
Quick Planning Checklist
| ✅ Step | 📅 When |
|---|---|
| Book pre-trail hotel (Dobbiaco/Villabassa/Cortina) | 2–3 months before trip |
| Reserve all rifugi (AV1) | 2–4 months ahead (longer in July–August) |
| Plan post-trail stay in Belluno | 1–2 months in advance |
| Confirm bus/train connections | 1 week before hike |
| Carry a printed/refreshed itinerary | Before departure |
Final Thought
The Alta Via 1 isn’t just about the trail—it’s about the entire experience, and your accommodations shape a big part of that. Booking the right rifugi lets you rest, refuel, and connect with fellow hikers each night. A comfortable stay before and after the trail ensures you begin and end your trek refreshed and grounded.
Take your time to plan, book early, and prepare to enjoy some of the most atmospheric lodging in the Alps.

How Much Does It Cost to Hike the Alta Via 1 Trail?
A complete breakdown of daily and total expenses for your Dolomites hut-to-hut adventure
The Alta Via 1 can be a relatively affordable trek by European standards—especially compared to guided tours or hotel-based hiking. But it’s not free, and with multiple nights in rifugi, transportation, and meals, the costs can add up quickly.
Here’s a complete cost breakdown so you can plan your budget with confidence.
Typical Daily Costs on the Alta Via 1
| Category | Average Cost (per day) |
|---|---|
| 🛏️ Accommodation | €60–85 (half board) |
| 🥾 Lunch / Packed Meal | €8–15 |
| ☕ Drinks / Snacks | €5–15 |
| 🚿 Showers (coin-op) | €3–5 (some included in half board) |
| 🍷 Alcohol / Extras | €5–12 (e.g. jug of wine, beer) |
| 🧃 Water refills | Usually free, but limited in some rifugi |
| Estimated daily total | €80–120 |
💡 Tip: If you order à la carte meals and drinks frequently, or stay in huts with private rooms, you’ll land on the higher end of the range.
Upfront Costs Before the Trail
| Item | Estimated Cost |
|---|---|
| 🛏️ Pre-hike hotel (1–2 nights) | €50–120/night |
| 🚌 Transport to trailhead (e.g. Dobbiaco to Lago di Braies) | €5–15 |
| 🥾 Gear (boots, backpack, liner, etc.) | Varies (only if needed) |
| 🗺️ Maps / guidebooks / GPS apps | €0–30 |
| 💼 Travel insurance | €20–50 (recommended) |
Post-Hike Costs
| Category | Estimated Cost |
|---|---|
| 🚌 Bus from La Pissa to Belluno | ~€4–6 |
| 🛏️ Hotel in Belluno (optional) | €50–100 |
| 🚆 Train from Belluno onward | €10–30 depending on route |
Total Cost for 8-Day Hike (Budget to Comfort Range)
| Expense | Budget (€) | Comfort (€) |
|---|---|---|
| 8 nights in rifugi | €480 | €680 |
| Food, snacks, drinks | €120 | €200 |
| Showers, extras | €20 | €40 |
| Pre-/post-accommodation | €100 | €200 |
| Transportation | €30 | €60 |
| Total (approx.) | €750 | €1,180 |
Money-Saving Tips
- 🔌 Bring a power bank to avoid paying for charging.
- 🧴 Use a refillable water bottle and ask for water at rifugi instead of buying bottled.
- 🥖 Carry snacks from town instead of buying trail snacks daily.
- 💳 Ask if rifugio price includes showers—some do, some charge separately.
- 🚫 Skip alcohol or order house wine in bulk—a jug often costs less than two beers.
**Do You Need Cash?
Yes—bring cash!**
While some rifugi accept credit cards, many do not or lose connection due to remote location. Bring at least:
- €100–150 in cash if you’re paying by card where possible
- €250–300 in cash if you’re unsure about card acceptance
Break it into small bills and coins for showers, snacks, and wine.
Final Thought
You can hike the Alta Via 1 for less than €100/day with careful planning, or spend more for added comfort and flexibility. Either way, you’re paying for unforgettable views, mountain hospitality, and the joy of disconnecting in one of Europe’s most dramatic landscapes.
It’s not just a hike—it’s an experience well worth every euro.
What Gear Do You Need for the Alta Via 1 Trail?
A complete packing list for a successful hut-to-hut hike through the Dolomites
Also Read: Alta Via 1 Packing List

The Alta Via 1 is a hut-to-hut trek, which means you don’t need to carry camping gear or heavy food supplies. You also do not need any rock climbing equipment, as the route is non-technical and does not involve rock climbing or scrambling. But you’ll still need to be prepared for alpine weather, long hiking days, and basic rifugio living. This guide gives you a smart, lightweight gear list to keep your pack under control without compromising comfort or safety.
Also Read: Best Hiking Watches
🎒 Backpack & Storage
| Item | Details |
|---|---|
| Backpack (30–40L) Also Read: Best Hiking Daypacks | Large enough for clothes, gear & food—keep it under 10kg |
| Rain cover | Sudden storms are common—this is essential |
| Daypack (optional) | For side hikes or as a compressible town bag |
| Dry bags / zip pouches | For organization and weather protection |
Also read: Best Hiking Rain Jacket
🥾 Footwear
| Item | Details |
|---|---|
| Hiking boots or shoes | Well-broken-in, waterproof, and with good grip |
| Camp shoes / sandals | For evenings in the rifugio |
| Hiking socks (2–3 pairs) | Wool or synthetic—quick-drying and blister-preventing |
| Blister kit | Compeed, tape, or your go-to solution |
💡 Do multiple training hikes with your full footwear kit beforehand.
Also Read: Best Hiking Boots for Men
Also Read: Best Hiking Socks
👕 Clothing – Layered for Alpine Conditions
| Layer | Recommended Items |
|---|---|
| Base layers | 2 moisture-wicking shirts, 1 pair long underwear (optional) |
| Insulation | 1 fleece or light puffy jacket |
| Outer shell | Waterproof jacket (essential), optional lightweight pants |
| Pants/shorts | 1 hiking pants, 1 hiking shorts |
| Sleepwear | Light T-shirt and leggings or long underwear |
| Underwear | 2–3 pairs, fast-drying |
| Hat & gloves | Warm hat + gloves for mornings/elevation Also Read: Best Hiking Gloves |
| Sun protection | Cap or buff, sunglasses, sunscreen |
🛌 Rifugio Essentials
| Item | Details |
|---|---|
| Sleeping bag liner | Required in most rifugi (silk or cotton) |
| Earplugs | Dorms = snorers |
| Headlamp | For midnight toilet runs or early starts |
| Quick-dry towel | Small/medium travel towel for showers |
| Flip-flops / sandals | Many rifugi require indoor shoes |
| Power bank | Limited charging in huts; bring 1 high-capacity battery |
| Charging cable + adapter | EU plug standard |
Also Read: Hiking Essentials for Beginners
Also Read: Best Hiking Headlamps
🧼 Toiletries & Health
| Item | Details |
|---|---|
| Toothbrush & toothpaste | Travel size |
| Soap / body wipes | Biodegradable or dry wipes for limited showers |
| Sunscreen & lip balm | High SPF recommended (UV is strong at altitude) |
| First aid kit | Blister care, painkillers, personal meds |
| Hand sanitizer | Not always available in huts |
| Toilet paper / tissues | Bring a small roll—some toilets run out |
🍎 Food & Water
| Item | Details |
|---|---|
| Water bottles/bladder | 1.5–2 liters total capacity |
| Electrolyte tablets | Helpful during hot, sweaty days |
| Trail snacks | Energy bars, nuts, dried fruit—buy before the trail |
| Cash for food & drinks | Most rifugi offer meals, wine, coffee, and packed lunches |
🥪 Tip: Order packed lunches from rifugi the night before or carry your own.
🗺️ Navigation & Docs
| Item | Details |
|---|---|
| Offline map app | Komoot, AllTrails, or Gaia GPS (download maps) |
| Paper map (optional) | Tabacco Maps 03, 07, 015 (Alta Via 1 coverage) |
| Itinerary printout | Include rifugio bookings and contact info |
| Passport / ID | Required for check-in |
| Cash (€200–300) | Many huts don’t accept cards |
🧠 Optional but Useful
- Trekking poles – Highly recommended for steep descents and knee relief
- Lightweight gaiters – If crossing muddy or scree terrain
- Journal & pen – For notes or sketching memories
- Book / Kindle – For hut evenings
- Reusable utensils – If bringing your own snacks/lunches
Also Read: Best Trekking Poles
🧳 Packing Tips
- Stick to lightweight, quick-dry materials
- Pack in layers, not bulky items
- Aim for under 10 kg total pack weight
- Don’t bring more than 2–3 of anything—you’ll re-wear everything
Alta Via 1 Gear Checklist Summary
| Category | Must-Haves |
|---|---|
| Backpack | 30–40L + rain cover |
| Footwear | Hiking boots/shoes + camp shoes |
| Clothing | Layers + rain gear + sun protection |
| Sleeping | Bag liner, earplugs, headlamp |
| Toiletries | Compact kit + towel + sanitizer |
| Navigation | Offline maps + itinerary printout |
| Trail food & water | Water bottles, snacks, electrolytes |
| Payments | Cash, ID, emergency card backup |
| Optional extras | Poles, Kindle, journal, first aid, dry bags |
Final Thought
You don’t need to overpack—but you do need to be prepared. The Alta Via 1 can throw heat, storms, rocky climbs, and cold huts your way. With the right gear, you’ll be able to hike comfortably, sleep well, and focus on what matters: the breathtaking landscapes and the experience of a lifetime.
How Hard is the Alta Via 1 Trail?
Everything you need to know about trail difficulty, fitness level, and terrain challenges
Also Read: Rheinsteig Hike Germany Guide

The Alta Via 1 is considered a moderate to challenging long-distance trek. Hiking Alta Via 1 offers both significant challenges and rewarding experiences, attracting hikers looking for a demanding yet accessible adventure. It doesn’t require technical mountaineering skills (no ropes, crampons, or climbing), but it does demand solid fitness, a good head for heights, and preparation for changing terrain and weather.
What Makes the Alta Via 1 Challenging?
- Elevation Gain: Expect around 6,500–7,000 m of ascent over 120 km. Many days involve 500–1,000 m of climbing—often in steep, rocky terrain.
- Distance: Average days are 12–18 km, but some (like Day 4) stretch beyond 20 km.
- Trail Surface: Loose rock, scree, narrow paths, and exposed sections are common. Trekking poles are strongly recommended.
- Weather: Afternoon thunderstorms are frequent in summer. Days can be hot (30°C+) and nights chilly.
- Altitude: While not extreme, most of the trail sits between 1,500 and 2,700 m, which can impact energy levels.
- Facilities: Some rifugi are basic (e.g., no showers, limited food), requiring mental flexibility and resilience.
Do You Need to Be an Experienced Hiker?
Not necessarily—but you do need:
- A good base level of cardio fitness
- Comfort hiking 6–9 hours per day with a loaded pack
- Experience with steep, uneven, and rocky trails
- Willingness to hike in various weather conditions
Who Will Enjoy the Alta Via 1 Most?
- Intermediate hikers wanting a multi-day alpine challenge
- Adventure travelers seeking dramatic scenery without needing ropes
- Solo hikers, couples, or small groups who enjoy hut-to-hut hiking
Who Might Struggle?
- First-time hikers with no mountain experience
- Anyone unprepared for altitude, heat, or storm exposure
- Hikers expecting luxury or hotel-like stays every night

Bottom Line
The Alta Via 1 is a rewarding but physical experience. If you’re fit, prepared, and realistic about the rustic mountain hut lifestyle, it’s absolutely doable—and unforgettable. With some training and planning, the challenge becomes part of the joy.
How to Train for the Alta Via 1 Trail
Build strength, endurance, and confidence for one of Europe’s most scenic multi-day hikes
Also Read: Struga Macedonia Travel Guide

The Alta Via 1 isn’t a technical trail, but don’t underestimate it—it’s physically demanding, especially over 8+ days. Training well can mean the difference between loving the experience and just surviving it. Here’s how to prepare your body and mind for success on the trail.
What You’re Training For
To train effectively, it helps to understand what the Alta Via 1 demands:
| Factor | Details |
|---|---|
| Daily Distance | 10–22 km per day (avg. 6–9 hrs hiking) |
| Elevation Gain/Loss | 500–1,100 m up and down daily |
| Terrain Type | Rocky, uneven, exposed, with steep sections |
| Altitude | 1,500–2,700 m (moderate effect on stamina) |
| Backpack Weight | 7–10 kg (clothes, water, snacks, etc.) |
| Duration | 7–12 days continuously |
1. Build Endurance (Your Base Fitness)
Start 3–4 months before your hike, gradually increasing duration and intensity.
- Hike or walk 3–5 times per week. Focus on longer distances and time on your feet.
- Aim for at least one long hike per week: 12–18 km with elevation.
- Add incline training—use hills, stairs, or treadmill incline.
- Simulate full days: Build up to back-to-back long hikes on weekends.
2. Train with Elevation
Alta Via 1 includes steep, sustained climbs—sometimes 1,000 m+ in a single day.
- Practice hiking routes with 1,000 m elevation gain/loss.
- Use a weighted backpack (~8–10 kg) to simulate real trail load.
- Incorporate hill repeats or stair intervals (30–60 mins) if you’re in a flat area.
3. Strengthen Key Muscle Groups
Strong legs, core, and stabilizers reduce fatigue and injury risk.
Focus on:
- Legs: Squats, lunges, step-ups, hill sprints
- Core: Planks, side planks, mountain climbers
- Balance: Single-leg exercises, Bosu ball work
- Shoulders/back: Light upper-body work to support your pack
2–3 strength sessions per week (30–45 mins) will make a big difference.
Also Read: Wolfberg Arch & Maltese Cross Wild Camping
4. Mental Preparation & Trail Conditioning
- Do hikes in bad weather or variable conditions—rain, heat, wind.
- Practice hiking when tired, hungry, or uncomfortable. AV1 has long days.
- Get comfortable navigating rocky or narrow trails.
- Simulate hut-to-hut style by hiking multiple days in a row.
5. Gear Up & Test Your Kit
Use your training hikes to test your exact setup:
- Break in your hiking boots or trail shoes
- Dial in your backpack fit
- Practice carrying water, snacks, layers, and a first-aid kit
- Know how your body reacts to full-day effort with pack weight
Sample 8-Week Training Plan (Final Push)
| Week | Key Focus |
|---|---|
| Week 1–2 | Hike 8–10 km, 300–500 m elevation, 3x/week |
| Week 3–4 | Add weighted backpack; do 12 km+ hikes 1x/week |
| Week 5–6 | Back-to-back hikes on weekends (Sat & Sun) |
| Week 7 | Peak week: 15–20 km with 1,000 m gain |
| Week 8 | Taper week: reduce distance but stay active |
Bonus Tips
- Stretch & recover: Foam roll, hydrate, and rest—especially after long hikes.
- Train nutrition: Practice eating/snacking on the trail.
- Altitude adjustment: If possible, hike at 1,500–2,000 m in training.
- Track progress: Use apps like Strava or AllTrails to monitor your hikes.
Final Thought
The Alta Via 1 rewards preparation. You don’t need to be an ultra-athlete—but you do need consistent cardio fitness, strong legs, and hiking stamina. Train smart, build gradually, and use your practice hikes to enjoy nature and build confidence. When you finally stand on the rocky pass above Lago di Lagazuoi or eat dinner at a rifugio with your boots off, you’ll know every training session was worth it.
Alternative Hikes to the Alta Via 1 Trail
Looking for something similar to the Alta Via 1—but different in pace, scenery, or difficulty? These treks offer breathtaking views, rifugio stays, and unforgettable alpine experiences. For those seeking a more challenging and technical adventure, consider the Walker’s Haute Route, a renowned high-altitude traverse in the Alps known for its demanding terrain, elevation, and appeal to experienced mountaineers.
🏔️ 1. Alta Via 2 (Italy)
- Length: ~160 km
- Duration: 10–14 days
- Difficulty: Harder than AV1 (more technical sections, via ferrata options)
- Highlights: Remote terrain, fewer crowds, more rugged and wild
- Why choose it: For experienced hikers wanting a more challenging, less touristy Dolomites experience
🧗 Includes optional via ferrata routes—helmet and harness may be required
⛰️ 2. Tour du Mont Blanc (France, Italy, Switzerland)
- Length: ~170 km
- Duration: 8–11 days
- Difficulty: Moderate
- Highlights: Circles the Mont Blanc massif; alpine villages, glaciers, cultural mix
- Why choose it: A classic European trek with high comfort levels and diverse landscapes

Also Read: Tour Du Mont Blanc Guide
🏘️ You can stay in mountain huts, hotels, or gîtes. Very popular—book early.
🇦🇹 3. Stubai High Trail (Austria)
- Length: ~85 km
- Duration: 8–9 days
- Difficulty: Moderate to hard
- Highlights: Wild valleys, high alpine lakes, glaciers, charming Austrian huts
- Why choose it: Less commercial than AV1 but equally scenic—with excellent hut infrastructure
🎒 Rougher and quieter, perfect for solitude lovers
🇨🇭 4. Walker’s Haute Route (Switzerland/France)
- Length: ~200 km
- Duration: 12–14 days
- Difficulty: Hard
- Highlights: From Mont Blanc in Chamonix to the Matterhorn in Zermatt
- Why choose it: For those seeking long-distance high alpine trekking with epic views and physical challenge
🏔️ Elevation gain is intense—this is a bucket-list-level hike
🇮🇹 5. Alta Via 4 (Italy – Dolomites)
- Length: ~85 km
- Duration: 6–8 days
- Difficulty: Hard, includes exposed sections and optional via ferrata
- Highlights: Wild, jagged Dolomiti peaks and solitude
- Why choose it: For experienced hikers who loved AV1 but want more adventure and fewer people
🇸🇪 6. Kungsleden (Sweden)
- Length: ~440 km (can be split into shorter sections)
- Duration: 5–25 days depending on section
- Difficulty: Easy to moderate
- Highlights: Arctic wilderness, Swedish huts, reindeer herds, northern lights (late season)
- Why choose it: If you want remoteness, serenity, and low technical challenge
❄️ Huts don’t serve food—self-catering required
🇫🇷 7. GR20 (Corsica, France)
- Length: ~180 km
- Duration: 12–16 days
- Difficulty: Very hard – considered Europe’s toughest long-distance hike
- Highlights: Coastal views, jagged granite ridges, rugged interior of Corsica
- Why choose it: For ultra-fit hikers seeking serious physical and mental challenge
🇮🇹 8. Alta Via 1 of the Aosta Valley (Italy)
- Length: ~150 km
- Duration: 8–10 days
- Difficulty: Moderate
- Highlights: Views of Monte Rosa, Gran Paradiso, and the Matterhorn
- Why choose it: Lesser-known alternative with Italian alpine charm and fewer crowds
Comparison at a Glance
| Trail | Country | Duration | Difficulty | Style |
|---|---|---|---|---|
| Alta Via 1 | Italy (Dolomites) | 8–12 days | Moderate | Rifugio to rifugio |
| Alta Via 2 | Italy (Dolomites) | 10–14 days | Hard | Remote & technical |
| Tour du Mont Blanc | France/Italy/CH | 8–11 days | Moderate | Hotel & hut mix |
| Stubai High Trail | Austria | 8–9 days | Moderate/Hard | Classic Austrian huts |
| Walker’s Haute Route | France/Switzerland | 12–14 days | Hard | Huts & hotels |
| Kungsleden | Sweden | 5–25 days | Easy/Moderate | Hut or tent |
| GR20 | Corsica (France) | 12–16 days | Very Hard | Huts / camping |
| Alta Via Aosta | Italy | 8–10 days | Moderate | Rifugi + remote trails |
Final Thought
If you loved the Alta Via 1, you’re spoiled for choice with alternatives that match (or exceed) its beauty, challenge, and sense of adventure. Whether you’re looking for more technical difficulty, less crowds, or new landscapes, there’s a trail waiting for you—across the Alps, Scandinavia, or even Mediterranean mountains.
Choose based on your comfort zone, hiking goals, and craving for wild beauty.
Alta Via 1 Trail – FAQ (Frequently Asked Questions)
Your most common questions about hiking the AV1, answered clearly and quickly.
🗓️ When is the best time to hike the Alta Via 1?
The trail is usually open from late June to mid-September.
- Best time: Mid-July to early September for snow-free passes and fully open rifugi.
- Avoid: Late June (snow may linger) and after mid-September (huts close).
⛺ Do I need to camp on the trail?
No. The AV1 is a hut-to-hut hike—you stay in rifugi that provide beds, meals, and basic facilities. Wild camping is not allowed in the Dolomites Nature Parks.
📅 Do I need to book the rifugi in advance?
Yes. Most huts book out months in advance during peak season. Reserve your entire itinerary 2–3 months before departure, especially July–August.
💰 Can I pay with credit card at the huts?
Some huts accept cards, but many are cash-only or lose signal in remote areas. Bring €200–300 in cash for your trek to be safe.
🧭 Is the trail well-marked?
Yes. The Alta Via 1 is well-marked with red and white AV1 signs, but you should still bring:
- An offline GPS app (e.g. Komoot, AllTrails, Gaia)
- A printed map (Tabacco maps recommended)
🥾 Do I need to be super fit to complete the AV1?
You need moderate to good hiking fitness. You’ll walk 6–9 hours per day with 500–1,000 m of elevation gain. No climbing skills needed, but training in advance is essential.
🎒 How heavy should my backpack be?
Aim for 7–10 kg total. The lighter, the better. You don’t need to carry food, stove, or a tent—just clothing, water, toiletries, and essentials.
🚿 Are there showers in the rifugi?
Some huts have hot showers (included or coin-operated). Others (like Rifugio Biella or Vazzoler) have limited or no showers. Bring wet wipes for backup.
🧼 Do rifugi provide towels or bedding?
- Towels: Rare—bring a quick-dry travel towel.
- Bedding: Provided (mattress, pillow, blanket), but you must bring your own sleeping bag liner.
🚰 Is water safe to drink on the trail?
Yes, from rifugi taps (unless otherwise noted). Water is limited on the trail itself, so always carry 1.5–2L and refill at huts.
🗣️ Do the rifugi staff speak English?
Most staff speak basic English, especially in popular huts. Knowing a few phrases in Italian or German helps and is appreciated.
🚌 How do I get to the start and from the end?
- Start: Take a bus from Dobbiaco or Cortina to Lago di Braies.
- Finish: End at La Pissa, take a bus to Belluno, then continue by train or bus to your next destination.
🚫 Can I hike the AV1 in reverse?
Technically yes, but it’s not recommended. The trail signs and hut bookings are set up for north-to-south travel, starting at Lago di Braies.
🎯 Is it safe to hike the AV1 solo?
Yes—many solo hikers complete the trail. The route is well-marked, busy in season, and rifugi are welcoming. Just make sure to leave your itinerary with someone and bring basic first aid and navigation tools.
Also Read: Best Trekking Poles